时间与窗口

时间与窗口的验证

1
2
3
4
5
6
7
8
9
10
11
12
13
14
15
16
17
18
19
20
21
22
23
24
25
26
27
28
29
30
31
32
33
34
35
36
37
38
39
40
41
42
43
44
45
46
47
48
49
50
51
52
53
54
55
56
57
58
59
60
61
package flink.demo.time

import java.time.Duration

import org.apache.flink.api.common.eventtime.{SerializableTimestampAssigner, WatermarkStrategy}
import org.apache.flink.api.scala._
import org.apache.flink.streaming.api.CheckpointingMode
import org.apache.flink.streaming.api.environment.CheckpointConfig.ExternalizedCheckpointCleanup
import org.apache.flink.streaming.api.scala.StreamExecutionEnvironment
import org.apache.flink.streaming.api.windowing.assigners.TumblingEventTimeWindows
import org.apache.flink.streaming.api.windowing.time.Time
import org.apache.flink.util.Collector


/**
* @author guo
* @date 2022/11/12
*/
object FlinkTimeJob {

def main(args: Array[String]): Unit = {

val env = StreamExecutionEnvironment.getExecutionEnvironment
env.setParallelism(1)

env.enableCheckpointing(600 * 1000, CheckpointingMode.EXACTLY_ONCE)
env.getCheckpointConfig.setMinPauseBetweenCheckpoints(500)
env.getCheckpointConfig.setCheckpointTimeout(60000)
env.getCheckpointConfig.setMaxConcurrentCheckpoints(1)
env.getCheckpointConfig.setExternalizedCheckpointCleanup(ExternalizedCheckpointCleanup.RETAIN_ON_CANCELLATION)

// 水印周期
env.getConfig.setAutoWatermarkInterval(2000)

env.socketTextStream("localhost", 9192, '\n')
.map(str => {
val keyAndTimestamp = str.split(",")
Tuple2(keyAndTimestamp(0), keyAndTimestamp(1).toLong)
})
.assignTimestampsAndWatermarks(
WatermarkStrategy.forGenerator[(String, Long)](_ => new BoundedOutOfOrdernessWatermarksWithLog(Duration.ofSeconds(10)))
.withTimestampAssigner(new SerializableTimestampAssigner[(String, Long)] {
override def extractTimestamp(element: (String, Long), recordTimestamp: Long): Long = element._2
})
)
.keyBy(_._1)
.window(TumblingEventTimeWindows.of(Time.seconds(3)))
// .windowAll(TumblingEventTimeWindows.of(Time.seconds(3)))
// .allowedLateness(Time.seconds(2)) // 允许数据迟到, 只要当前 water_mark < window_end_time + lateness, 迟到的数据还是可以出发已经执行过窗口的处理
.apply((key, window, iterable, collector: Collector[String]) => {
val start = window.getStart
val end = window.getEnd
val windowElementConcat = iterable.mkString(",")
val res = s"key: $key, Window: [$start, $end), [${DateTimeUtil.toDateTime(start)}, ${DateTimeUtil.toDateTime(end)}), window elements: $windowElementConcat"
collector.collect(res)
})
.print()

env.execute("flink demo")
}
}
1
2
3
4
5
6
7
8
9
10
11
12
13
14
15
16
17
18
19
20
21
22
23
24
25
26
27
28
29
30
31
32
33
34
35
36
37
38
39
40
41
42
43
44
45
46
47
48
49
50
51
52
53
54
55
56
57
58
package flink.demo.time;

import org.apache.flink.api.common.eventtime.Watermark;
import org.apache.flink.api.common.eventtime.WatermarkGenerator;
import org.apache.flink.api.common.eventtime.WatermarkOutput;

import java.time.Duration;

import static org.apache.flink.util.Preconditions.checkArgument;
import static org.apache.flink.util.Preconditions.checkNotNull;

/**
* @author guo
* @date 2024/4/4
*/
public class BoundedOutOfOrdernessWatermarksWithLog<T> implements WatermarkGenerator<T> {

/**
* The maximum timestamp encountered so far.
*/
private long maxTimestamp;

/**
* The maximum out-of-orderness that this watermark generator assumes.
*/
private final long outOfOrdernessMillis;

/**
* Creates a new watermark generator with the given out-of-orderness bound.
*
* @param maxOutOfOrderness The bound for the out-of-orderness of the event timestamps.
*/
public BoundedOutOfOrdernessWatermarksWithLog(Duration maxOutOfOrderness) {
checkNotNull(maxOutOfOrderness, "maxOutOfOrderness");
checkArgument(!maxOutOfOrderness.isNegative(), "maxOutOfOrderness cannot be negative");

this.outOfOrdernessMillis = maxOutOfOrderness.toMillis();

// start so that our lowest watermark would be Long.MIN_VALUE.
this.maxTimestamp = Long.MIN_VALUE + outOfOrdernessMillis + 1;
}

// ------------------------------------------------------------------------

@Override
public void onEvent(T event, long eventTimestamp, WatermarkOutput output) {
maxTimestamp = Math.max(maxTimestamp, eventTimestamp);

System.err.println("onEvent: eventTimestamp:" + DateTimeUtil.toDateTimeStr(eventTimestamp)
+ ", maxTimestamp:" + DateTimeUtil.toDateTimeStr(maxTimestamp));
}

@Override
public void onPeriodicEmit(WatermarkOutput output) {
output.emitWatermark(new Watermark(maxTimestamp - outOfOrdernessMillis - 1));
System.err.println("emit watermark:" + DateTimeUtil.toDateTimeStr(maxTimestamp - outOfOrdernessMillis - 1));
}
}
1
2
3
4
5
6
7
8
9
10
11
12
13
14
15
16
17
18
19
package flink.demo.time

import java.time.format.DateTimeFormatter
import java.time.{Instant, ZoneId}

/**
* @author guo
* @date 2024/4/4
*/
object DateTimeUtil {

def toDateTime(ts: Long): String = {
Instant.ofEpochMilli(ts).atZone(ZoneId.systemDefault()).toLocalDateTime.format(DateTimeFormatter.ofPattern("yyyy-MM-dd HH:mm:ss.SSS"))
}

def toDateTimeStr(ts: Long): String = {
ts + " <=> " + Instant.ofEpochMilli(ts).atZone(ZoneId.systemDefault()).toLocalDateTime.format(DateTimeFormatter.ofPattern("yyyy-MM-dd HH:mm:ss.SSS"))
}
}
1
2
3
4
5
6
7
8
9
10
11
12
13
14
15
16
17
18
19
20
21
22
23
24
25
26
27
28
29
30
31
32
33
34
35
36
37
38
39
40
41
42
43
44
45
46
47
48
49
50
51
52
53
54
55
56
57
58
59
60
61
62
63
64
65
66
67
68
69
70
71
72
73
74
75
76
77
78
79
80
81
82
83
84
85
86
87
88
89
90
91
92
93
94
95
96
97
98
99
100
101
102
103
104
105
106
107
108
109
110
111
112
113
114
115
116
117
118
119
120
121
122
123
124
125
126
127
128
129
130
131
132
133
134
135
136
137
138
139
140
141
142
143
144
145
146
147
148
149
150
151
152
<?xml version="1.0" encoding="UTF-8"?>
<project xmlns="http://maven.apache.org/POM/4.0.0"
xmlns:xsi="http://www.w3.org/2001/XMLSchema-instance"
xsi:schemaLocation="http://maven.apache.org/POM/4.0.0 http://maven.apache.org/xsd/maven-4.0.0.xsd">
<modelVersion>4.0.0</modelVersion>

<groupId>org.example</groupId>
<artifactId>flink-test</artifactId>
<version>1.0-SNAPSHOT</version>

<properties>
<project.build.sourceEncoding>UTF-8</project.build.sourceEncoding>

<flink.version>1.15.0</flink.version>
<scala.binary.version>2.12</scala.binary.version>

<target.java.version>1.8</target.java.version>
<maven.compiler.source>${target.java.version}</maven.compiler.source>
<maven.compiler.target>${target.java.version}</maven.compiler.target>

<log4j.version>2.12.1</log4j.version>
</properties>

<repositories>
<repository>
<id>apache.snapshots</id>
<name>Apache Development Snapshot Repository</name>
<url>https://repository.apache.org/content/repositories/snapshots/</url>
<releases>
<enabled>false</enabled>
</releases>
<snapshots>
<enabled>true</enabled>
</snapshots>
</repository>
</repositories>

<dependencies>

<dependency>
<groupId>org.apache.flink</groupId>
<artifactId>flink-clients</artifactId>
<version>${flink.version}</version>
</dependency>

<dependency>
<groupId>org.apache.flink</groupId>
<artifactId>flink-streaming-scala_${scala.binary.version}</artifactId>
<version>${flink.version}</version>
</dependency>

<dependency>
<groupId>org.apache.flink</groupId>
<artifactId>flink-connector-kafka</artifactId>
<version>${flink.version}</version>
</dependency>

<dependency>
<groupId>org.apache.flink</groupId>
<artifactId>flink-walkthrough-common</artifactId>
<version>${flink.version}</version>
</dependency>

<!-- Add logging framework, to produce console output when running in the IDE. -->
<!-- These dependencies are excluded from the application JAR by default. -->
<dependency>
<groupId>org.apache.logging.log4j</groupId>
<artifactId>log4j-slf4j-impl</artifactId>
<version>${log4j.version}</version>
<scope>runtime</scope>
</dependency>
<dependency>
<groupId>org.apache.logging.log4j</groupId>
<artifactId>log4j-api</artifactId>
<version>${log4j.version}</version>
<scope>runtime</scope>
</dependency>
<dependency>
<groupId>org.apache.logging.log4j</groupId>
<artifactId>log4j-core</artifactId>
<version>${log4j.version}</version>
<scope>runtime</scope>
</dependency>
</dependencies>

<build>
<plugins>

<plugin>
<groupId>org.scala-tools</groupId>
<artifactId>maven-scala-plugin</artifactId>
<version>2.15.2</version>
</plugin>

<!-- Java Compiler -->
<plugin>
<groupId>org.apache.maven.plugins</groupId>
<artifactId>maven-compiler-plugin</artifactId>
<version>3.1</version>
<configuration>
<source>${target.java.version}</source>
<target>${target.java.version}</target>
</configuration>
</plugin>

<!-- We use the maven-shade plugin to create a fat jar that contains all necessary dependencies. -->
<!-- Change the value of <mainClass>...</mainClass> if your program entry point changes. -->
<plugin>
<groupId>org.apache.maven.plugins</groupId>
<artifactId>maven-shade-plugin</artifactId>
<version>3.0.0</version>
<executions>
<!-- Run shade goal on package phase -->
<execution>
<phase>package</phase>
<goals>
<goal>shade</goal>
</goals>
<configuration>
<artifactSet>
<excludes>
<exclude>org.apache.flink:force-shading</exclude>
<exclude>com.google.code.findbugs:jsr305</exclude>
<exclude>org.slf4j:*</exclude>
<exclude>org.apache.logging.log4j:*</exclude>
</excludes>
</artifactSet>
<filters>
<filter>
<!-- Do not copy the signatures in the META-INF folder.
Otherwise, this might cause SecurityExceptions when using the JAR. -->
<artifact>*:*</artifact>
<excludes>
<exclude>META-INF/*.SF</exclude>
<exclude>META-INF/*.DSA</exclude>
<exclude>META-INF/*.RSA</exclude>
</excludes>
</filter>
</filters>
<transformers>
<transformer
implementation="org.apache.maven.plugins.shade.resource.ManifestResourceTransformer">
<mainClass>spendreport.FraudDetectionJob</mainClass>
</transformer>
</transformers>
</configuration>
</execution>
</executions>
</plugin>
</plugins>
</build>
</project>

保持与 Redis 相同的 TTL 操作

保持与 Redis 相同的 TTL 操作

Redis 中没有 Hbase 中时间版本的概念与机制,也可以认为只有当前版本,并且 TTL 是针对整个 Key 的,而 Hbase 的 TTL 可以基于列族或者单元设定,不是基于整个行键的,如果我们将 Redis 中的数据迁移到 Hbase 中,对应的 TTL 就是一个问题,原来基于 Redis 机制的应用中使用也是一个问题,所以为了保持旧的应用兼容(在不对原有应用做大量重构测试的情况下,只在 API 层面兼容修改),只能手动针对 Hbase 的单元的 TTL 进行设置。

假设现在 API 层面,需要将原有的 Redis 访问替换为 Hbase 的访问,需要做一些 API 层面的映射。首先抛开所使用的底层缓存方案,将缓存抽象:每个缓存数据都属于一张表,这张表中缓存的是某个特定领域,特定应用的数据,访问时,需要指定表名,有两种基本的结构(和 Redis 保持一致) Key-Value, Key-HashKey-Value, 这样就可以为开发人员提供一个抽象层的 API, 开发人员并不需要特别关注底层缓存的方案,如果后面更换缓存方案,可以提供 API 层的兼容。

Hbase 中单元有时间版本的概念(VERSIONS), 一般设置 1 就够了,还有最小版本(MIN_VERSIONS), 可以设置为 0, 保证早于 TTL 的时间版本的数据不会返回。如果我们多次对一个单元进行写,即使设置了最大版本为 1, 如果最近的版本因为 TTL 过期,之前的版本没有过期,而且因为没有合并,没有被删除,还是会被查询出来,这显示对于原来使用 Redis 的应用来说,是不可接受的,所以只能在设置 TTL 时,手动删除之前的版本,而且, TTL 一般来说只是影响数据保存的时间长短,我们是为了清理数据设置的 TTL, 所以这个操作可以异步来进行。即使某次操作失败了,也可以等待下一次的操作进行设置。

这是一个同步的测试,使用 checkAndMutate 方法

1
2
3
4
5
6
7
8
9
10
11
12
13
14
15
16
17
18
19
20
21
22
23
24
25
26
27
28
29
30
31
32
33
34
35
36
37
38
39
40
41
42
43
44
45
46
47
48
49
50
51
52
53
54
55
56
57
58
59
60
61
62
63
64
65
66
67
68
69
70
71
72
73
74
75
76
77
78
79
80
81
package test.bigdata

import java.time.{Duration, Instant, LocalDateTime, ZoneId}
import java.util
import java.util.Date

import org.apache.hadoop.hbase.{CellUtil, HBaseConfiguration, TableName}
import org.apache.hadoop.hbase.client.{ConnectionFactory, Delete, Get, Put, RowMutations, Table}
import org.apache.hadoop.hbase.util.Bytes
import org.apache.hadoop.hbase.util.Bytes.toBytes

/**
* @author guo
* @date 2022/7/24
*/
object HbaseExpireTest {

def main(args: Array[String]): Unit = {
val configuration = HBaseConfiguration.create()

// hbase pseudo distributed cluster on nas docker
configuration.set("hbase.zookeeper.quorum", "harisekhon-hbase1")
configuration.set("hbase.zookeeper.property.clientPort", "2181")

var connection = ConnectionFactory.createConnection(configuration)
var table: Table = connection.getTable(TableName.valueOf("Test:user"))

try {
connection = ConnectionFactory.createConnection(configuration)
table = connection.getTable(TableName.valueOf("Test:user"))
val rowKey = toBytes("r14")
val family = toBytes("info")
val qualifier = toBytes("name")
val value = toBytes("hello world")
val ttl = Duration.ofMinutes(10).toMillis

// 先不设置 TTL, 直接 Put
val put = new Put(rowKey).addColumn(family, qualifier, value)
table.put(put)

val get = new Get(rowKey).addColumn(family, qualifier)
println("after first set:" + Bytes.toString(table.get(get).getValue(family, qualifier)))

// 设置 TTL, 先检查值是否相等,再进行原子操作: 删除,新增并设置 TTL
// 如果不相等,说明其它实例可能修改了单元的值,所以此次不再设置,等待其它实例设置即可
val time = new Date().getTime
val firstDel = new Delete(rowKey, time).addColumns(family, qualifier)
val secondPut = new Put(rowKey, time + 100).addColumn(family, qualifier, value).setTTL(ttl)
val delAndPut = RowMutations.of(util.Arrays.asList(firstDel, secondPut))

val bool = table.checkAndMutate(rowKey, family)
.qualifier(qualifier)
.ifEquals(value)
.thenMutate(delAndPut)
println("check and execute result:" + bool)

val limitMinutes = 5
val end = LocalDateTime.now().plusMinutes(limitMinutes)
while (LocalDateTime.now().isBefore(end)) {
val get = new Get(rowKey).addColumn(family, qualifier).readAllVersions
val cells = table.get(get).rawCells()
if (cells != null && cells.nonEmpty) {
for (cell <- cells) {
val timestamp = cell.getTimestamp
val family = Bytes.toString(CellUtil.cloneFamily(cell))
val qualifier = Bytes.toString(CellUtil.cloneQualifier(cell))
val value = Bytes.toString(CellUtil.cloneValue(cell))
val row = Bytes.toString(CellUtil.cloneRow(cell))
println(s"${LocalDateTime.now()} row:$row, family: $family, qualifier:$qualifier, timestamp:$timestamp, value:$value, ${Instant.ofEpochMilli(timestamp).atZone(ZoneId.systemDefault()).toLocalDateTime}")
}
} else {
println("cells null or empty")
}
Thread.sleep(1000)
}
} finally {
table.close()
connection.close()
}
}
}

Vim 介绍

Vim 的基本使用

内容取自 byte-of-vim, 查看原文,请参考文末链接.

Vim

Vim 是一个用于写作的计算机程序(computer program),提供一系列特性帮助你更好地进行写作。 可以用来编写购物清单,写书,或者是程序代码。

为什么选择 Vim

简单

  • 极简主义界面,帮助你集中注意力
  • 少许的核心概念

高效

There is no great writing, only great rewriting.

​ ——Louis Brandeis

与纯文本或富文本编辑器对比,Vim 可以使得复杂大量频繁的修改该变得更容易,更快,更好。Minimal effort. Maximal effect.

Vim 能干什么?

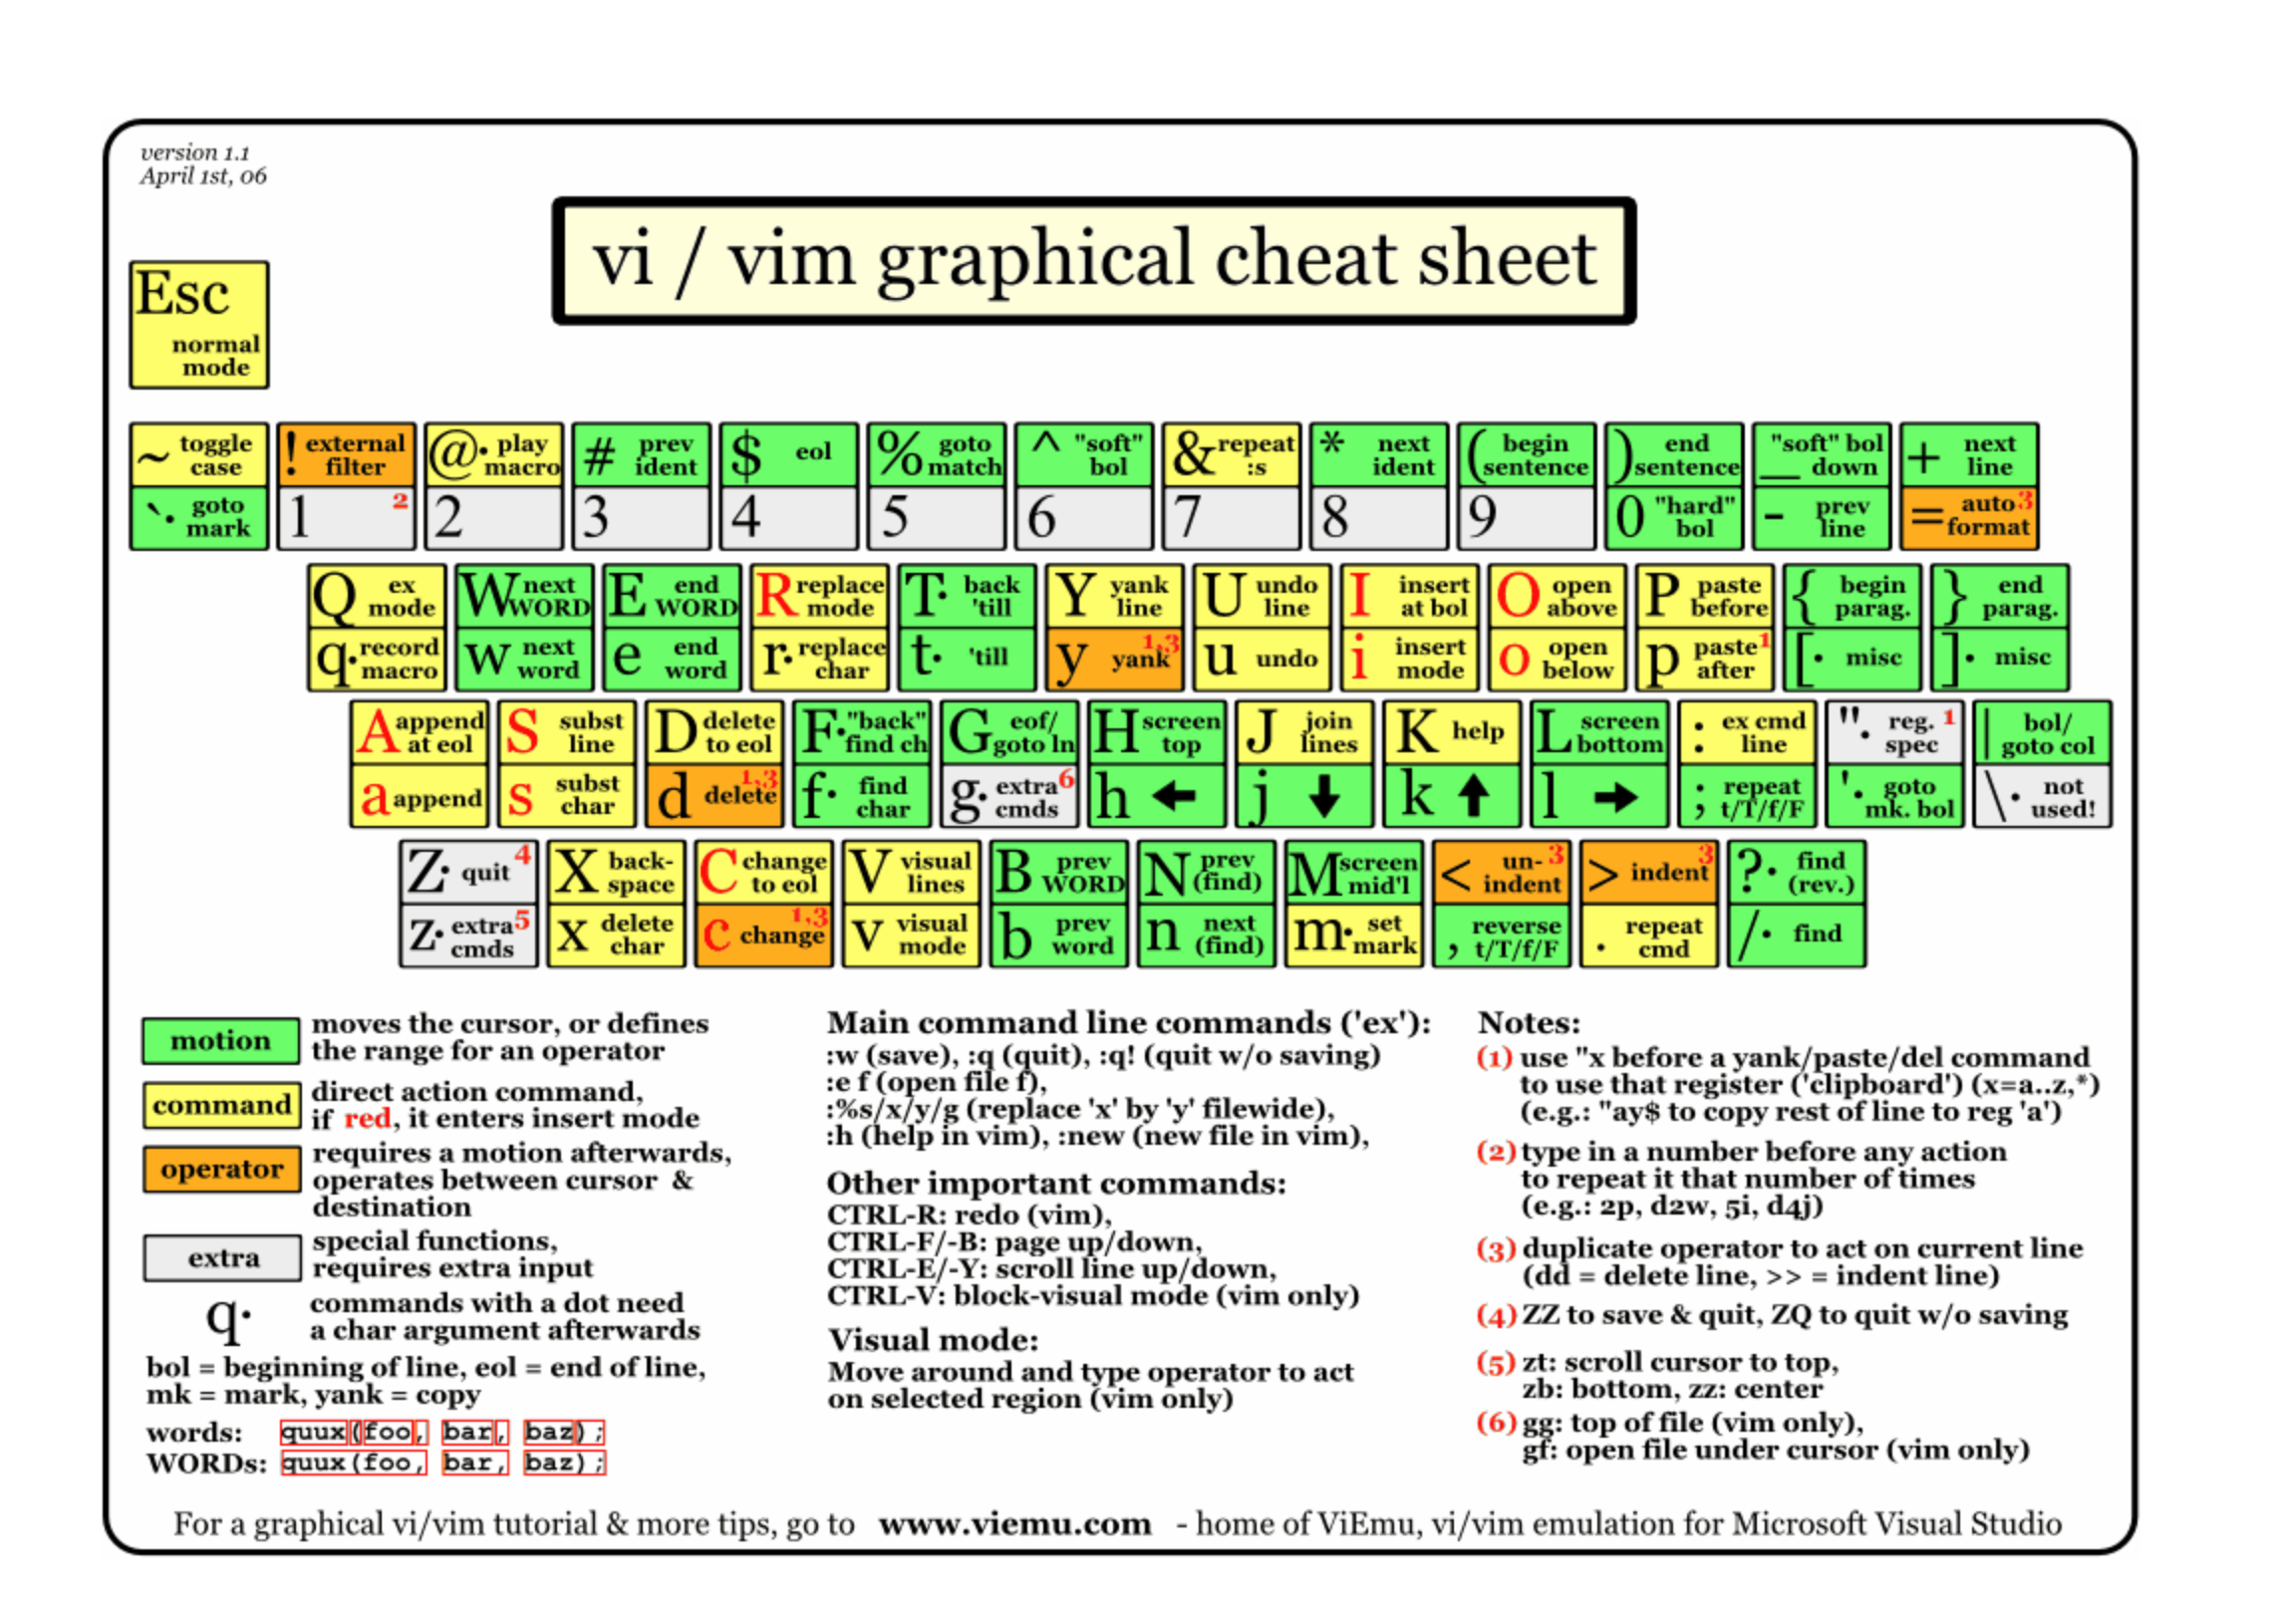
说了这么多漂亮话,Vim 到底强在哪里?

Example

编辑 Vim 中的操作
如何将光标向下移动 7 行 Press 7j
删除一个单词 Press dw
搜索文档中光标所在的单词 Press *
在 50-100 行进行查找并替换 Run :50,100s/old/new/g (s = substitute, c = confirmation )
如果光标所在的单词是一个文件,如何打开 gf (g = goto, f = file)
如果每行只有前N个字符是有用的? ctrl-v –> y (copy)
…… ……

所以,你被说服了吗?

我们为什么学习 Vim ?

Vim 图形化界面版本

Windows

Mac OS X

Linux/BSD

image-20200901204140178

​ Windos 下的 Vim

终端版本

Windows

Mac OS X

Linux/BSD

image-20200901204402296

最重要的概念 - 模式

Vim 中的模式也许是最令刚接触 Vim 的人最疑惑的部分,为什么打开不能直接输入文字?该怎么样保存并退出 Vim?据说 Stack Overflow 上关于如何退出 Vim 的问题,其点击量已有上百万次了

Vim 中不同的模式就像是电视机中的正常模式和 DVD 模式,每种模式都有其特定的功能。模式使得功能区得以划分,使得事情变得尽可能简单。Vim 的目标之一就是使用键盘就可以完成所有工作,而不需要借助鼠标。

Normal Mode (正常模式/命令行模式)

A mode for running commands

Vim 启动的默认模式

1
2
3
4
5
# Vim command :echo
:echo "Hello world"

# Vim command :help takes us to the table of contents of the reference manual
:help usr_toc

Insert Mode (插入模式/编辑模式)

A mode for writing text

打开 Vim,命令行模式下运行 :e temp.txt, 按下 i, 进入编辑模式,输入文本;

按下 <ESC>, 切换回命令行模式,运行 :w 命令保存

使用命令进行更方便的移动光标

除了 i 之外,你还可以

Command Action
i insert text just before the cursor
I insert text at the start of the line
a append text just after the cursor
A append text at the end of the line

光标移动,并切换为 Insert Mode

其他常用操作命令

Command Action
o open a new line below
O open a new line above
s substitute character
S substitutes the whole line
r replace the current character
R replace continuous characters

编辑完文本,切换回 Normal Mode, 是一个良好的习惯,完成文档的初始编写时,最好切换为 Normal Mode。

这两种模式的切换时如此的简单,按下 i 即可进入编辑模式, <ESC> 即可切换为命令行模式,图形化界面看似提供了很多菜单选项,可是如果上百个命令,以及这些命令的组合,图形化界面是难以做到的。

一旦你理解了 Vim 的模式 (哲学), 你就不会觉得好难用,好奇怪,是吧?

Visual mode

假如想要选中一连串的单词(words),并将它们完全替换为新的文本, 该如何做呢?你可不想按住删除键全部删除,再重新添加新的文本吧?Visual Mode 就将发挥它的作用。

Normal Mode 下,按下 v 或则 V 进入 Visual Mode

Command desc
v Visual Mode, character basis
V Visual Mode, line basis

image-20200901215958686

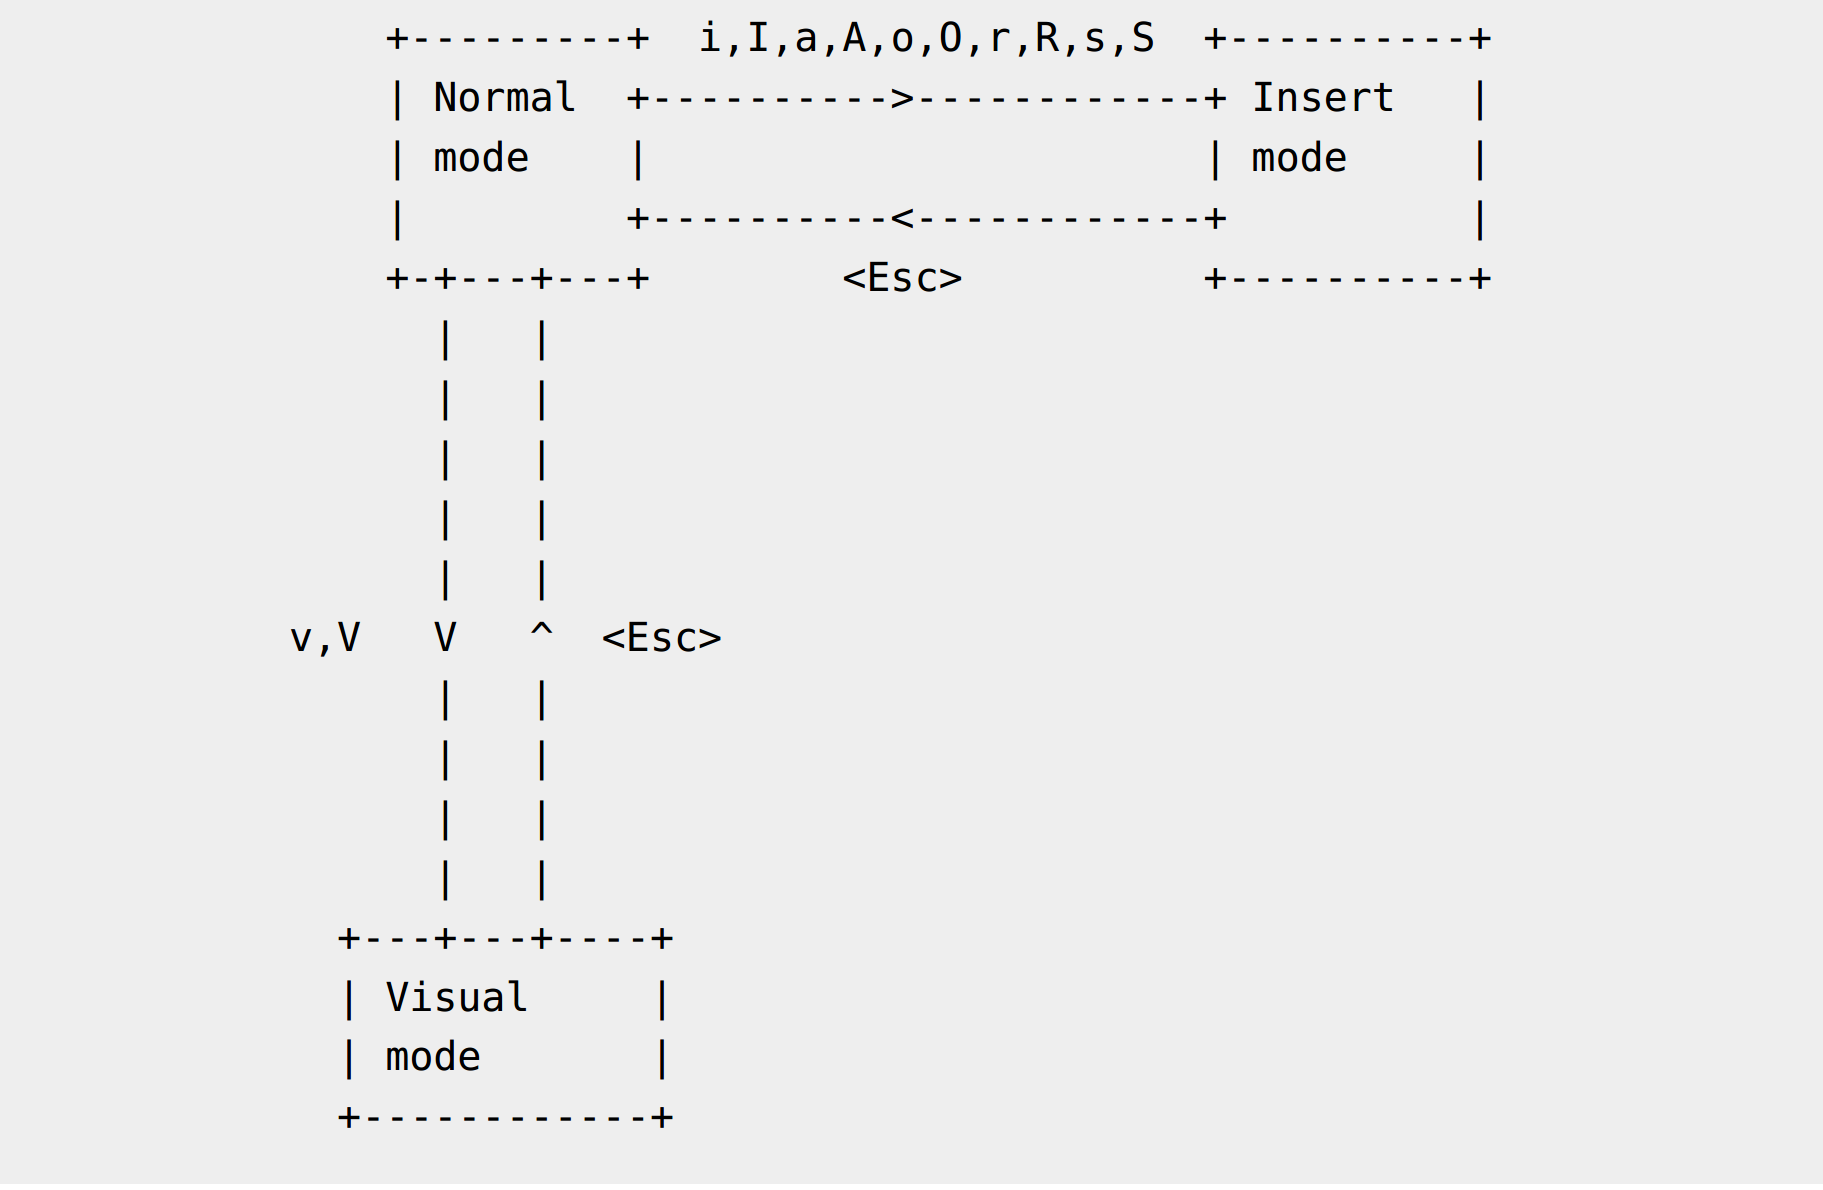
​ relation between the difference modes

Graphical cheat sheet

image-20200901221532521

总结

理解模式是如何工作的,以及如何进行模式的切换是成为一个 Vimmer 的关键,当然, Vim 也只是众多编辑器中的一种 (如 Vim 于 Emacs 之争),如何选择,取决于你的个人习惯和偏好,工欲善其事必先利其器,Vim 也只是提供了一种选择,这个看似古老的软件依然在庞大的程序员群体中占有一席之地,继续发光发热。

参考文献

[1] A Byte of Vim

[2] 7 versatile Vim commands that are easy to memorize

[3] Vim Galore

[4] Graphical vi-vim Cheat Sheet and Tutorial

cURL批量请求

cURL 批量请求

req_params 文件中每一行都是一个 JSON 字符串,表示每次请求的请求体

1
2
3
4
5
6
{"a":"b", "c":"{\"d\":\"f\"}"}

现在需要针对每个请求体进行调用

1
2
3
4
5
# 重点在于 read 的参数 -r, 表示 raw 模式,不把输入的反斜杠字符解释为转义字符
# 如果不指定该参数,每行中的 \ 会被认为是转义字符,表示对后一个字符的转义,就不是一个合法的 JSON
while read -r line; do
curl -H 'Content-Type: application/json' -d "$line" http://192.168.31.224:8080/curl/print
done < req_params

使用 here document 进行请求参数的填充

1
2
3
4
5
6
7
8
while read ph; do
input=$(cat << EOF
{"phone":"${ph}"}
EOF
)
curl -H 'Content-Type: application/json' -d "${input}" http://192.168.31.224:8080/curl/print
echo
done < phone

read 命令 - Bash 脚本教程 - 网道 (wangdoc.com)

xxd命令

xxd 命令

xxd 用来对指定的文件或来自标准输入的数据进行十六进制转储,也可以将将十六进制转换为原始的二进制格式,允许以邮件安全的 ASCII 表示传输二进制数据,base64 其实也可以达到相同的目的。也可以用来进行二进制文件 patching

选项

如果没有指定输入文件或输出文件,或者指定为 - ,使用标准输入或标准输出

  • -a | -autoskip 开启自动跳过,以 * 代替空行(nul-lines),默认关闭

  • -b | -bits 切换到二进制位模式,而不是十六进制, -r, -p,-i 下不生效

1
2
3
$ echo -n "hello" | xxd -b

00000000: 01101000 01100101 01101100 01101100 01101111 hello
  • -c cols | -cols cols 输出的每行包含 cols 个字节,默认是 16 个 (-i: 12, -ps: 30, -b: 6).最大 256
1
2
3
4
5
$ echo -n "hello" | xxd -b -c 2

00000000: 01101000 01100101 he
00000002: 01101100 01101100 ll
00000004: 01101111 o
  • -E | -EBCDIC ASCII 表示切换为 EBCDIC(国际)编码 meaningless in combinations with -r, -p or -i

  • -g bytes | -groupsize bytes 每 bytes 个字节,添加一个空格进行分隔分组

1
2
3
4
5
$ echo  "hello" | xxd -g 1
00000000: 68 65 6c 6c 6f 0a hello.

$ echo "hello" | xxd -g 2
00000000: 6865 6c6c 6f0a hello.
  • -p | -ps | -postscript | -plain 以连续连续十六进制样式输出
1
2
$ echo  "hello" | xxd -p
68656c6c6f0a
  • -r | -revert 将十六进制转为二进制。如果不是写到 stdout, xxd 在不截断的情况下将其写入输出文件。使用 -r -p 读取连续的十六进制输出(不包含行号信息,没有特定的列布局)

  • -seek offset

    When used after -r: revert with <offset> added to file positions found in hexdump.

  • -s [+][-]seek

    start at <seek> bytes abs. (or rel.) infile offset. + indicates that the seek is relative to the current stdin file position (meaningless when not reading from stdin). - indicates that the seek should be that many characters from the end of the input (or if combined with +: before the current stdin file position). Without -s option, xxd starts at the current file position.

    跳过多少字节

1
2
3
4
5
6
7
8
9
10
11
12
13
14
15
16
17
18
19
20
21
22
23
24
25
xxd text
00000000: 6865 6c6c 6f0a 4f6e 2054 7565 7364 6179 hello.On Tuesday
00000010: 2c20 7468 6520 4c69 6e75 7820 5379 7374 , the Linux Syst
00000020: 656d 0a41 646d 696e 6973 7472 6174 6f72 em.Administrator
00000030: 2773 2067 726f 7570 206d 6565 7469 6e67 's group meeting
00000040: 2077 696c 6c20 6265 2068 656c 642e 5379 will be held.Sy
00000050: 7374 656d 0a41 646d 696e 6973 7472 6174 stem.Administrat
00000060: 6f72 2041 6c6c 2053 7973 7465 6d20 4164 or All System Ad
00000070: 6d69 6e69 7374 7261 746f 7273 2073 686f ministrators sho
00000080: 756c 6420 6174 7465 6e64 2e20 5379 7374 uld attend. Syst
00000090: 656d 0a41 646d 696e 6973 7472 6174 6f72 em.Administrator
000000a0: 2054 6861 6e6b 2079 6f75 2066 6f72 2079 Thank you for y
000000b0: 6f75 7220 6174 7465 6e64 616e 6365 2e0a our attendance..

# xxd 每行默认 16 个字节,0x30 也就是 48 个字节,刚好是前 3 行
xxd -s 0x30 text
00000030: 2773 2067 726f 7570 206d 6565 7469 6e67 's group meeting
00000040: 2077 696c 6c20 6265 2068 656c 642e 5379 will be held.Sy
00000050: 7374 656d 0a41 646d 696e 6973 7472 6174 stem.Administrat
00000060: 6f72 2041 6c6c 2053 7973 7465 6d20 4164 or All System Ad
00000070: 6d69 6e69 7374 7261 746f 7273 2073 686f ministrators sho
00000080: 756c 6420 6174 7465 6e64 2e20 5379 7374 uld attend. Syst
00000090: 656d 0a41 646d 696e 6973 7472 6174 6f72 em.Administrator
000000a0: 2054 6861 6e6b 2079 6f75 2066 6f72 2079 Thank you for y
000000b0: 6f75 7220 6174 7465 6e64 616e 6365 2e0a our attendance..
  • -l len | -len len 只打印出 len 个字节
1
2
xxd -l 5 text
00000000: 6865 6c6c 6f hello
  • -u 使用大写的十六进制字母,默认是小写的

1
2
# Create a 65537 byte file with all bytes 0x00, except for the last one which is 'A' (hex 0x41).
% echo "010000: 41" | xxd -r > file

参考

XXD