PKCS

PKCS

PKCS (Public-Key Cryptography Standards) 公钥密码标准由 RSA 公司制定, 用于标准化公钥基础设施 (public key infrastructure), 从 PKCS #1, PKCS #2 到 PKCS #15 总共提供了 15 个标准

PKCS #1

RSA 密码算法的加密标准,定义了 RSA 公钥函数,数字证书等的基础规则;也定义了 RSA 私钥和公钥的语法, 可以用来计算 RSA 算法中使用的密钥对。除了这些,还定义了数字证书应该如何计算,以及数据的结构应该如何被签名,数字签名的格式

用于 RSA 公钥密钥

PKCS #7

加密消息语法标准。定义了加密操作结果形式数据的语法,例如数字签名 (digital signature) 和数字信封 (digital envelopes)

用于生成和验证数字签名和由 PKI 管理的证书

用于证书或证书链

示例

生成 PKCS 7 证书链

1
2
3
# ca.p7b created through openssl crl2pkcs7 command represents a certificate chain/path:

$ openssl crl2pkcs7 -certfile root_ca.crt -certfile sub_ca.crt -outform PEM -out ca.p7b -nocrl

使用 JCA 验证

1
2
3
4
5
6
7
8
9
public static void loadCertPath() throws Exception {
CertificateFactory cerfFactory = CertificateFactory.getInstance("X.509");
try (InputStream inputStream = new FileInputStream("D:\\idea-workspace\\ca.p7b")) {
CertPath certPath = cerfFactory.generateCertPath(inputStream, "PKCS7");
for (Certificate certificate : certPath.getCertificates()) {
System.out.println(((X509Certificate) certificate).getSubjectX500Principal());
}
}
}

PKCS #8

私钥信息标准。定义了私钥信息的语法。换句话说,定义了用来生成私钥的算法以及属性

用于各种公钥密码

PKCS #12

该标准描述了用于个人身份信息传输的语法,包含私钥、证书,各种各样的密钥以及扩展等。支持该标准的机器、应用、浏览器等允许用户对个人身份信息进行导入、导出以及使用。这个标准允许用户使用标准机制将数据从一个设备传输到另一台设备,并且保证私密性完整性(privacy and integrity), 可以使用受信任的公私钥对进行加密和签名,也可以使用基于口令的私密和完整性模式。

通过包含基本但辅助的身份信息以及私钥,以及通过公钥密码实现的隐私和完整性模式建立更高的安全性,可以将该标准视为在 PKCS#8 的基础上构建。

私密性主要是用于保护个人身份信息,如避免私钥(private key)泄露,有两种方式:

  • 公钥密码模式 (Public-key privacy mode)

    在信息交换前,个人身份信息通过使用来自受信任的目标平台的公钥(TPDestEncK)进行加密(envelop 封装于信封),加密后的数据只有目标平台持有的私钥才能进行解密(open envelop 开启信封)

1
2
3
4
Public-key privacy mode: Personal information is enveloped on the
source platform using a trusted encryption public key of a known
destination platform (see Section 3.3). The envelope is opened
with the corresponding private key.
  • 基于口令的加密 (Password privacy mode)

    从一个用户名以及私密口令生成一个对称密钥,用来进行加密个人信息

完整性主要用于确保内容没有被篡改,也有两种方式:

  • 公钥密码模式 (Public-key privacy mode)

    使用源平台的私钥对内容进行数字签名, 目标平台使用对应的公钥(TPSrcSigK)进行验证签名

  • 基于口令的完整性 (Password privacy mode)

    基于 MAC 消息验证码来保证,口令的目的是用于生成 MAC 中进行操作的共享密钥 (PBE,口令-盐-迭代次数)

私密性和完整性如果都使用基于口令的模式,他们可以使用相同的口令,也可以使用不同的口令

对于公钥/私钥对的两种使用,必须将密钥对中的公钥传输到另一个平台,以便可以信任它起源于正确的平台。 从这个意义上来说,判断公钥是否受信任最终必须留给用户。 有多种方法可确保公钥受信任(如公钥证书)。

PDU: 构成一个协议的消息的二进制位序列

Protocol Data Unit (PDU): A sequence of bits in machine-independent
format constituting a message in a protocol.

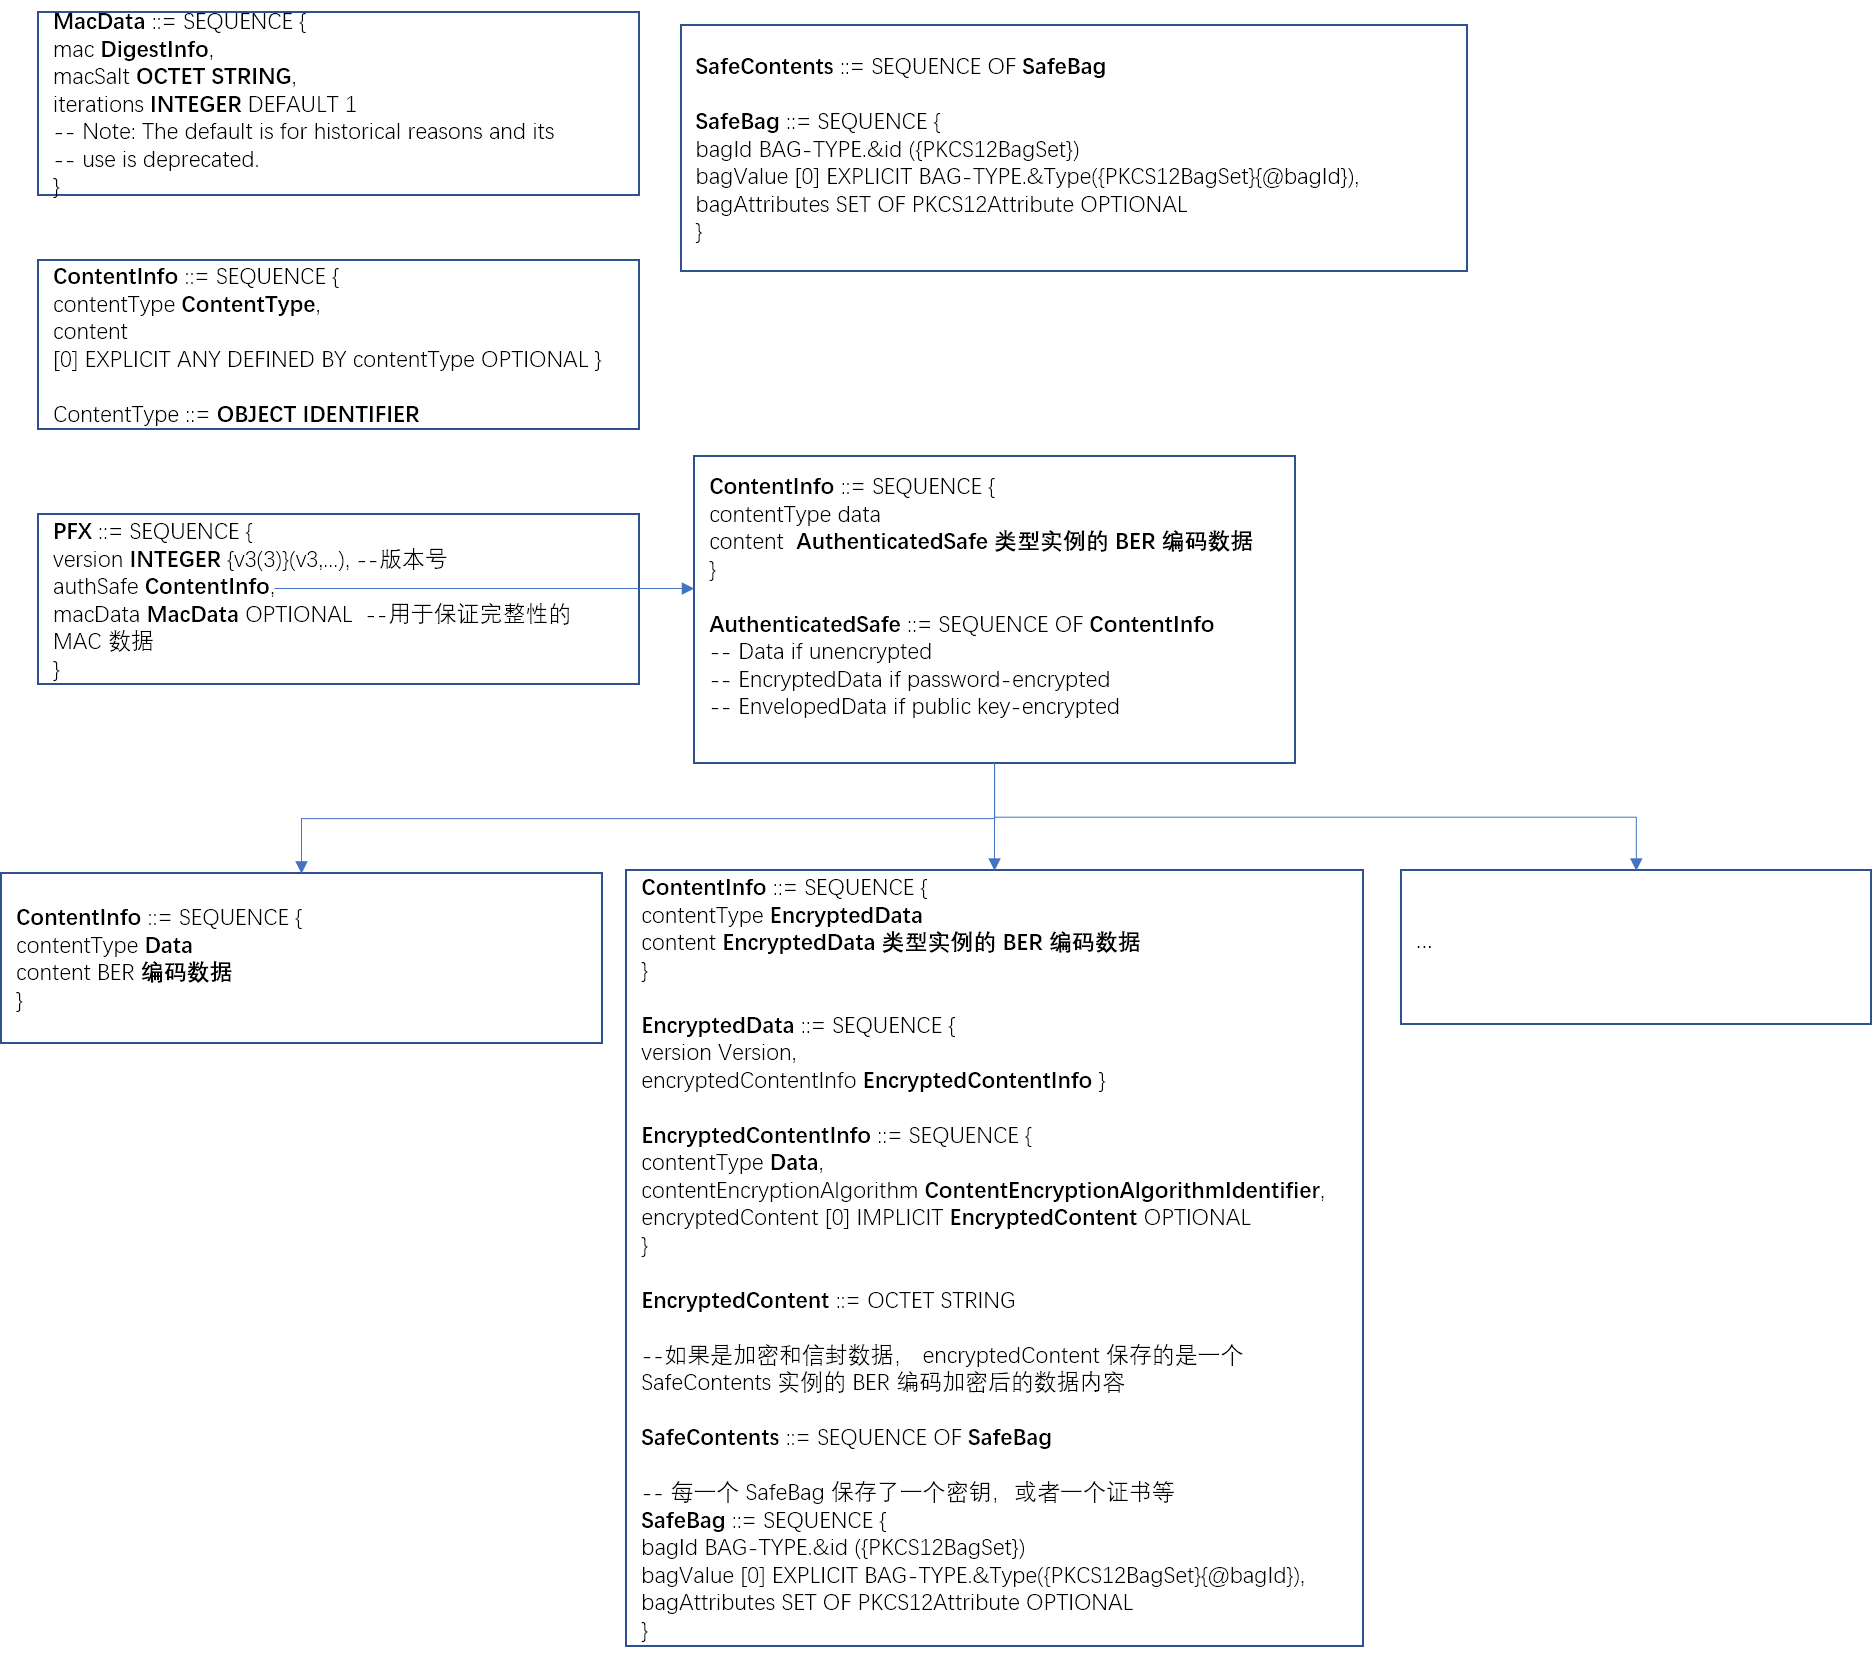
PFX: The top-level exchange PDU defined in this standard. The acronym is sometimes expanded as Personal Information Exchange.

用于数字证书+私钥, 常用文件后缀 .pfx, .p12 ,.pem

ASN.1 定义

1
2
3
4
5
6
7
8
9
10
11
12
13
14
15
16
17
18
19
20
21
22
23
24
25
26
27
28
29
30
31
32
33
34
35
36
37
PFX ::= SEQUENCE {
version INTEGER {v3(3)}(v3,...), --版本号
authSafe ContentInfo,
macData MacData OPTIONAL --用于保证完整性的 MAC 数据
}

MacData ::= SEQUENCE {
mac DigestInfo,
macSalt OCTET STRING,
iterations INTEGER DEFAULT 1
-- Note: The default is for historical reasons and its
-- use is deprecated.
}

-- ContentInfo 类型的 contentType 字段是一个 object identifier, 意味为其分配了一个唯一的整数,并使用字符串字面值来表示,定义了 6 中内容类型:data, signedData, envelopedData, signedAndEnvelopedData, digestedData, and encryptedData. 具体的定义位于 PKCS7 规范中

ContentInfo ::= SEQUENCE {
contentType ContentType,
content
[0] EXPLICIT ANY DEFINED BY contentType OPTIONAL }


ContentType ::= OBJECT IDENTIFIER

AuthenticatedSafe ::= SEQUENCE OF ContentInfo
-- Data if unencrypted
-- EncryptedData if password-encrypted
-- EnvelopedData if public key-encrypted

SafeContents ::= SEQUENCE OF SafeBag

-- 每一个 SafeBag 保存了一个密钥,或者一个证书等
SafeBag ::= SEQUENCE {
bagId BAG-TYPE.&id ({PKCS12BagSet})
bagValue [0] EXPLICIT BAG-TYPE.&Type({PKCS12BagSet}{@bagId}),
bagAttributes SET OF PKCS12Attribute OPTIONAL
}

authSafe 的 content 字段包含了一个 AuthenticatedSafe 类型数据的 BER 编码(直接或间接(签名数据)), AuthenticatedSafe 类型可以包含多个 ContentInfo 类型的数据,其中的每一个 ContentInfo 的 content 的值要么是明文,要么是加密过的,要么是信封数据。如果是加密和信封数据,保存的是一个 SafeContents 实例的 BER 编码

1
2
3
4
5
6
7
8
9
10
11
12
13
-- encrypted-data content type

EncryptedData ::= SEQUENCE {
version Version,
encryptedContentInfo EncryptedContentInfo }

EncryptedContentInfo ::= SEQUENCE {
contentType ContentType,
contentEncryptionAlgorithm ContentEncryptionAlgorithmIdentifier,
encryptedContent [0] IMPLICIT EncryptedContent OPTIONAL
}

EncryptedContent ::= OCTET STRING

简单的图示

图片2

示例

1
2
3
4
5
6
7
8
9
10
11
12
13
# 使用 openssl 创建 pkcs#12 文件

$ openssl pkcs12 -export -in con_key_crt.pem -out sub_ca.p12 -CAfile root_ca.crt -name myKeyEntry

# -export 表示创建一个 pkcs12 文件而不是解析一个 pkcs12 文件

# -in 表示包含私钥及证书的文件 PEM 格式
# con_key_crt.pem 是对密钥和证书的一个简单拼接
$ cat sub_ca_key.pem sub_ca.crt >> con_key_crt.pem

# -out 输出的 pkcs12 路径
# -CAfile 指定 CA 的证书文件
# -name 指定一个友好的别名, Java JCA 中的 KeyStore 中的 `alias`, 这也在 PKCS12 标准中进行了定义

openssl-man-pkcs12

使用 openssl 的 asn1parse 命令来解析生成的 pkcs12 文件

图片3

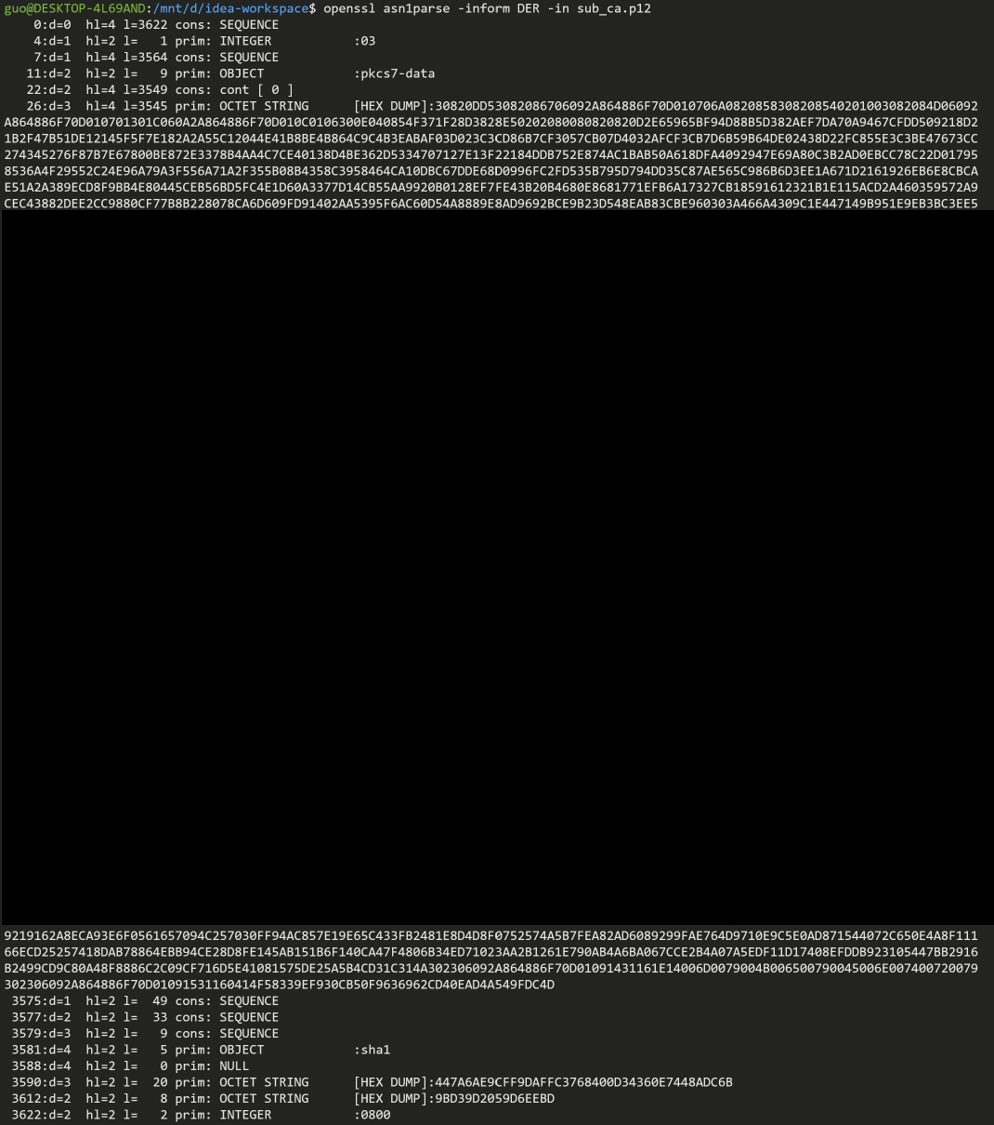
最后几行是 MAC 包含的信息,0800 表示 迭代次数, 倒数第二行是盐(salt)

PEM

PEM (Privacy Enhanced Mail) 私密增强邮件, 是 X.509 证书,CSRs (Certiticate Signing Requests) 证书签名请求,加密密钥的常用格式。PEM 文件包含了一个或多个 Base64 编码的内容,并且每一内容都有一个头部和尾部:

1
2
3
-----BEGIN RSA PRIVATE KEY-----
Base64 encoded data
-----END RSA PRIVATE KEY-----

单个 PEM 文件可以包含一个证书,一个私钥,或多个证书组成完整的证书信任链。

通常使用的文件扩展名:.crt, .pem, .cer, .key (用于密钥)

参考文献

[1] PKCS

[2] PKCS #1

[3] PKCS #7

[4] PKCS #12

[5] Introduction to Digital Signatures and PKCS #7

[6] openssl-man-asn1parse

hexdump命令

hexdump 命令

一点感想:自从学习 Shell 脚本编程以来,有时候会觉得,使用图形化界面的工具实现一个稍微复杂的操作过于麻烦,并且如果你学习过 Vim 的基本操作和哲学思想后,就会了解命令行的组合可以比图形界面上有限的菜单,按钮能做更过的事情,即实现高度的定制化。

简单介绍

hexdump 工具可以将指定的文件或标准输入,以用户指定的格式进行展示,打印到控制台,提供了很多选项(options),如打印出对应字符的八进制,十六进制

基本选项

-b 八进制

1
-b One-byte octal display.  Display the input offset in hexadecimal, followed by sixteen space-separated, three column, zero-filled, bytes of input data, in octal, per line.

每行首先以十六进制展示输入偏移量,然后将输入的每个字节以八进制展示 (占 3 位,不足 3 位的用 0 填充),并以空格分隔

1
2
3
4
$ echo -n 'hello' | hexdump -b

0000000 150 145 154 154 157
0000005

-c 字符

1
-c      One-byte character display.  Display the input offset in hexadecimal, followed by sixteen space-separated, three column, space-filled, characters of input data per line.

每行首先以十六进制展示输入偏移量,然后展示输入的每个字符 (占 3 位,不足 3 位的用空格填充),并以空格分隔

1
2
3
$ echo -n 'hello' | hexdump -c
0000000 h e l l o
0000005

-C 十六进制+ASCII字符

1
-C Canonical hex+ASCII display.  Display the input offset in hexadecimal, followed by sixteen space-separated, two column, hexadecimal bytes, followed by the same sixteen bytes in %_p format enclosed in ``|'' characters.

每行首先以十六进制展示输入偏移量,然后展示每个字节的十六进制,随后是包含在两个 | 中的对应的字符,非打印字符以 . 展示

1
2
3
$ echo -n 'hello' | hexdump -C
00000000 68 65 6c 6c 6f |hello|
00000005

-C 选项应该是比较常用的,比较方便对比字符与对应的十六进制

-d 两个字节的十进制

1
-d      Two-byte decimal display.  Display the input offset in hexadecimal, followed by eight space-separated, five column, zero-filled, two-byte units of input data, in unsigned decimal, per line.

每行首先以十六进制展示输入偏移量,然后将输入数据中的每两个字节作为一个单元,并展示他们组合成的无符号十进制数

1
2
3
$ echo -n 'hello' | hexdump -d
0000000 25960 27756 00111
0000005

注意:两个字节组合的顺序与字符的顺序相反,例如 he, h 的十六进制是 0x68e 的十六进制是 0x65, 但是字节组合的顺序是 0x6568, 对应的十进制就是上面结果中的 2590

1
2
$ echo $((16#6568))
25960

-x 两个字节的十六进制

1
-x      Two-byte hexadecimal display.  Display the input offset in hexadecimal, followed by eight, space separated, four column, zero-filled, two-byte quantities of input data, in hexadecimal, per line.

-d 类似

1
2
3
$ echo -n 'hello' | hexdump -x
0000000 6568 6c6c 006f
0000005

-n 只处理 n 个字节

1
-n length Interpret only length bytes of input.

-v 展示所有的字符

1
2
-v      Cause hexdump to display all input data.  Without the -v option, any number of groups of output lines, which would be identical to the immediately preceding group of output lines (except for the input offsets), are
replaced with a line comprised of a single asterisk.

格式化

-e 格式化字符串

1
2
-e format_string
Specify a format string to be used for displaying data.

指定格式化字符串

-f 包含格式化字符串的文件

1
2
-f format_file
Specify a file that contains one or more newline separated format strings. Empty lines and lines whose first non-blank character is a hash mark (#) are ignored.

一个格式化字符串由任意多个格式化单元(format unit)组成,每个格式化单元以空格分隔。一个格式化单元最多由三个部分组成:迭代次数(iteration count),字节个数 (byte count),以及格式字符串 (format)

迭代次数:可选的正整数,默认为1, 表示格式字符串要被应用多少次

字节个数: 可选的正整数. 如果指定了,它定义了每次应用格式字符串时,需要使用多少个字节

​ 如果指定了迭代次数和(或)字节个数,需要使用 / 来加以区分,如 1/4/4

格式字符串:必须指定,并且要包含在双引号中 "", 类似于 fprintf 中的格式字符串, 支持单个字符的转义序列:

1
2
3
4
5
6
7
8
NUL                  \0
<alert character> \a
<backspace> \b
<form-feed> \f
<newline> \n
<carriage return> \r
<tab> \t
<vertical tab> \v

如包含一个格式化单元的格式化字符串:'4/1 "%_p"' , 4 表示迭代次数,1表示每次使用一个字节,%_p 为格式字符串

也支持额外的转换字符串:

  • _a[dox] 展示输入偏移量 d,o,x 分表表示十进制,八进制和十六进制

  • _A[dox]_a[dox] 行为一致,但是只执行一次,当所有的输入数据都被处理了

  • _c 以默认的字符集打印出输入字符,非打印字符以八进制展示(占 3 位,不足三位用 0 填充),如果该字符支持转义序列,则会以转义序列的形式展示,如 \n

  • _p 以默认的字符集打印出输入字符. 非打印字符会被展示成 .

  • _u 打印出 ASCII 字符,控制字符会被展示成如下的名称(小写):

1
2
3
4
5
6
000 NUL  001 SOH  002 STX  003 ETX  004 EOT  005 ENQ
006 ACK 007 BEL 008 BS 009 HT 00A LF 00B VT
00C FF 00D CR 00E SO 00F SI 010 DLE 011 DC1
012 DC2 013 DC3 014 DC4 015 NAK 016 SYN 017 ETB
018 CAN 019 EM 01A SUB 01B ESC 01C FS 01D GS
01E RS 01F US 07F DEL

每个格式字符串需要使用字节个数等于所有格式化单元使用的字节个数加起来,每个格式化单元使用的字节个数 = 迭代次数 * 字节个数 (或者没有指定字节个数,格式单元需要的字节个数)

1
echo "ABCDEFGH" | hexdump -e '4/1 "%_p"'

上述中的格式化字符串需要使用的字节个数 = 4 * 1

输入数据,是以 “数据块”(blocks) 的形式处理的,一个数据块定义为所有格式化字符使用的最大字节数

指定格式化字符串的列子

打印输入数据的十六进制

1
2
3
$ echo hello | hexdump -v -e '/1 "%02X "' ; echo

68 65 6C 6C 6F 0A

打印输入数据的十六进制及字符

1
2
3
% echo hello | hexdump -e '8/1 "%02X ""\t"" "' -e '8/1 "%c""\n"'

68 65 6C 6C 6F 0A hello

打印十六进制,并加上前缀 x

1
2
3
# hex with preceding 'x'
$ echo hello | hexdump -v -e '"x" 1/1 "%02X" " "' ; echo
x68 x65 x6C x6C x6F x0A

打印十六进制,每行一个字节

1
2
3
4
5
6
7
8
# one hex byte per line
$ echo hello | hexdump -v -e '/1 "%02X\n"'
68
65
6C
6C
6F
0A

带偏移量

1
2
3
4
5
6
7
8
# byte# & ASCII with control chars
$ echo hello | hexdump -v -e '/1 "%_ad# "' -e '/1 " _%_u\_\n"'
0# _h_
1# _e_
2# _l_
3# _l_
4# _o_
5# _lf_

每行只打印一个字节对应的十六进制,以及对应的 ASCII 字符,行首打印偏移量,即序号

1
2
3
4
5
6
7
8
9
10
11
12
$ echo "ABCDEFG" | hexdump -e '/1 "%02_ad#  "' -e '/1 "%02X "' -e '/1 " %_u\n"'
00# 41 A
01# 42 B
02# 43 C
03# 44 D
04# 45 E
05# 46 F
06# 47 G
07# 0A lf


# lf 表示 LF 换行符

7C1C分隔符示例

1
2
3
4
5
6
7
8
9
10
11
12
# char.dat
echo -e "A\u007c\u001cB\u007c\u001cC" > char.dat

cat char.dat | hexdump -v -e '"%02_ad#\t"' -e '/1 "0x%02X\t"' -e '/1 "%_p\n"'
00# 0x41 A
01# 0x7C |
02# 0x1C .
03# 0x42 B
04# 0x7C |
05# 0x1C .
06# 0x43 C
07# 0x0A .
1
2
3
4
5
6
7
8
# a table of byte#, hex, decimal, octal, ASCII
% echo hello | hexdump -v -e '/1 "%_ad# "' -e '/1 "%02X hex"' -e '/1 " = %03i dec"' -e '/1 " = %03o oct"' -e '/1 " = _%c\_\n"'
0# 68 hex = 104 dec = 150 oct = _h_
1# 65 hex = 101 dec = 145 oct = _e_
2# 6C hex = 108 dec = 154 oct = _l_
3# 6C hex = 108 dec = 154 oct = _l_
4# 6F hex = 111 dec = 157 oct = _o_
5# 0A hex = 010 dec = 012 oct = _

加密与解密

加密与解密

Alice 向 Bob 发送邮件的场景, Alice 称为发送者(sender),Bob 称为接收者(receiver), 更普遍的场景,发出消息的一方称为发送者,接受到消息的为接收者。

信息从发送方的计算机发送到接受者的计算机,中间会经过多台计算机和通信设备进行中转,这个过程中就可能被恶意窃听者(eavesdropper)偷看到,窃听者不一定是人类,安装在通信设备的窃听器,邮件软件或服务器上的某些程序

为了不让别人看到邮件的内容, Alice 要对邮件进行加密(encrypt)后再发送出去,加密前的消息称为明文(plaintext),加密后的消息称为密文 (ciphertext). 明文被加密后就会变成看不懂的密文,密文被解密后,就会变回原来的明文。加密通过运用密码 (cryptography) 技术, 保证消息的机密性 (confidentiality).

破译

解密:正当的接收者将密文还原成明文

破译/密码分析:cryptanalysis 接收者以外的人试图将将密文还原为明文

破译者:cryptanalyst 进行破译的人

破译者不一定是坏人,如密码学研究者研究密码强度

对称密码与公钥密码

密码算法:解决复杂问题的步骤通常称为算法,明文生成密文的步骤,称为 加密算法,解密的步骤称为 解密算法。加密、解密的算法合在一起统称为密码算法.

密钥 (key): 密码算法中的密钥,一般是遗传非常大的数字, 无论是在加密时还是解密时, 都需要密钥. 正如现实世界中的密钥不能随便丢弃一样, 密码算法中的密钥也要注意不被他人窃取.

对称密码 (symmetric cryptography): 加密解密使用同一密钥的方式, 也称为 公共密钥密码 (common-key cryptography), 传统密码 (conventional cryptography), 私钥密码 (secret-key cryptography), 共享密钥密码 (shared-key cryptography)

公钥密码 (public-key cryptography): 加密解密使用不同密钥的方式, 所以也称为 非对称密码 (asymmetric cryptography)

混合密码系统: 对称密码与公钥密码结合起来使用

其它密码技术

  • 单向散列函数 (one-way hash function)

    属于保证完整性的密码技术 (数据时正牌的,不是伪造的). 软件供应商发布软件的时候, 也会发布该软件的散列值. 如 MD5 等.

    散列值 (hash) 又称哈希值, 密码校验和 (cryptographic checksum), 指纹 (fingerprint), 消息摘要(message digest)

    MD5信息摘要算法(英语:MD5 Message-Digest Algorithm),一种被广泛使用的密码散列函数,可以产生出一个128位(16字节)的散列值(hash value),用于确保信息传输完整一致。

    – 百度百科

  • 消息认证码 (message authentication code)

    不但 够确认消息是否被篡改,而且确认消息是否来自所期待的通信对象, 提供完整性认证机制, HMAC

  • 数字签名

    伪装(spoofing): 消息是否来自真正所谓的发送者

    篡改: 消息再传输的过程中被别有用心的修改了

    否认: 消息的发送者否认自己发送过

能够防止伪装, 篡改, 和 否认等威胁的技术, 就是数字签名(digital signature), 发送者对消息的内容加上数字签名, 接受者可以对数字签名进行验证(verify). 能够保证完整性, 提供认证防止否认的技术

  • 伪随机数生成器 (Pseudo Random Number Generator, PRNG)

    模拟产生随机数列的算法

  • 隐写术与数字水印

我们先准备一段话,
很容易看懂的就可以,
喜闻乐见的当然更好
欢迎你尝试将另一句话嵌在这段话中,
你会发现这其实就是一种隐写术

隐写术的目的时隐藏消息本身, 但是搞清楚了嵌入消息的方法, 也就可以搞清楚消息的内容. 因此, 隐写术不能替代密码.

密码隐藏的是内容, 隐写术隐藏的时消息本身

数字水印技术 就是运用了隐写术, 将著作拥有者及购买者的信息嵌入文件中的技术

密码与信息安全常识

  • 不要使用保密的密码算法

    1999 年, DVD 的密码算法被破解

    2007 年, NXP 的非接触式 IC 卡的密码算法被破解

    RSA 公司开发的 RC4 密码算法曾经也是保密的,但最终还是有一位匿名人士开发并公开了与其等效的程序

    密码算法的秘密早晚会公诸于世; 开发高强度的密码算法是非常困难的

  • 使用低强度的密码比不进行任何加密更危险

    对于用户来说,安全感与密码的强度无关,而只是由“信息已经被加密了“这一事实产生的,而这通常会导致用
    户在处理某些机密信息的时候麻痹大意

  • 任何密码总有一天都会被破解

    无论使用任何密码算法所生成的密文,只要将所有可能的密钥全部尝试一遍 就总有一天可以破译出来 因此 ,破译密文所需要花费的时间,与要保密的明文的价值之间的权衡就显得非常重要

  • 密码只是信息安全的一部分

    比如, 社会工程学 (social engineering) 攻击:

    办公室的电话响起: 您好, 我是 IT 部的, 由于需要对您的电脑进行安全检查, 请您将密码临时改为 XR2315. 实际拨打电话的有可能就是一名攻击者. 这些手段与密码的强度并没有关系.

    最脆弱的环节并不是密码, 而是人类自己

​ 简单密码技术: 凯撒密码, ROT13

initialization-on-demand holder

initialization-on-demand holder

In software engineering, the initialization-on-demand holder (design pattern) idiom is a lazy-loaded singleton. In all versions of Java, the idiom enables a safe, highly concurrent lazy initialization of static fields with good performance.[1][2]

是一种延迟加载单例模式,所有的 Java 版本中,都能够安全、高并发的延迟初始化静态字段,并且拥有很好的性能

1
2
3
4
5
6
7
8
9
10
11
public class Something {
private Something() {}

private static class LazyHolder {
static final Something INSTANCE = new Something();
}

public static Something getInstance() {
return LazyHolder.INSTANCE;
}
}

The implementation of the idiom relies on the initialization phase of execution within the Java Virtual Machine (JVM) as specified by the Java Language Specification (JLS).[3]

主要依赖于 JLS 规定的 JVM 执行的初始化阶段

When the class Something is loaded by the JVM, the class goes through initialization. Since the class does not have any static variables to initialize, the initialization completes trivially.

当 JVM 加载类 Something 类时,会执行这个类的初始化阶段,其实就是静态字段的初始化和静态代码块的执行,但 Something 没有什么要初始化的,所以 initialize 阶段就完成了。

The static class definition LazyHolder within it is not initialized until the JVM determines that LazyHolder must be executed. The static class LazyHolder is only executed when the static method getInstance is invoked on the class Something, and the first time this happens the JVM will load and initialize the LazyHolder class.

LazyHolder 这个静态内部类,只有 JVM 决定这个类被执行的时候,才会进行初始化(被 JVM 加载和初始化)。所以只有 Something.getInstance 方法调用时,当第一次调用时,JVM 会加载和初始化 LazyHolder 这个类。

The initialization of the LazyHolder class results in static variable INSTANCE being initialized by executing the (private) constructor for the outer class Something. Since the class initialization phase is guaranteed by the JLS to be sequential, i.e., non-concurrent, no further synchronization is required in the static getInstance method during loading and initialization.

LazyHolder 的初始化阶会导致静态变量 INSTANCE 被初始化,也就是执行 Something 的私有构造器。由于JLS 保证类的初始化阶段是串行的,即非并发的,因此静态getInstance方法中在加载和初始化 LazyHolder 期间不需要进一步的同步。

And since the initialization phase writes the static variable INSTANCE in a sequential operation, all subsequent concurrent invocations of the getInstance will return the same correctly initialized INSTANCE without incurring any additional synchronization overhead.

所有对 getInstance 方法的连续并发调用都会返回正确的初始化了的 INSTANCE, 并且没有任何额外的同步机制开销

While the implementation is an efficient thread-safe “singleton” cache without synchronization overhead, and better performing than uncontended synchronization,[4] the idiom can only be used when the construction of Something can be guaranteed to not fail. In most JVM implementations, if construction of Something fails, subsequent attempts to initialize it from the same class-loader will result in a NoClassDefFoundError failure.

虽然高效、线程安全,但是只有保证 Something 的构造方法不会失败的情况下,才可以使用

维基百科 - initialization-on-demand holder

类的加载

类加载就是将新的类型添加到运行中的 JVM 进程里的过程。将字节码文件(.class)文件加载进 JVM, 转换成类对象(Class 对象)。字节码文件属于二进制文件,字节流文件。

分为以下几个阶段:

  1. 加载

从文件系统、URL或其它位置读取字节数组,生成类对象的骨架,做一些基本检查

  1. 验证

确认类文件与预期相符,没有违背 JVM 的安全模型,避免导致 JVM 崩溃的字节码,或将 JVM 带入未知状态,出现恶意代码能攻击的漏洞

  1. 准备和解析

确保运行时直到类文件引用的每个类型,加载引用到的类型,和引用类型所依赖的类,直到直到所有类型为止

  1. 初始化

JVM 初始化类,初始化静态变脸,运行静态代码块。这是 JVM 首次执行新加载的类的字节码。初始化执行完毕后,类就完全加载好,可以使用了。

基础组件

Executor

Executor 接口中只定义了一个方法:

1
2
3
4
5
6
7
8
9
10
11
12
13
14
public interface Executor {

/**
* Executes the given command at some time in the future. The command
* may execute in a new thread, in a pooled thread, or in the calling
* thread, at the discretion of the {@code Executor} implementation.
*
* @param command the runnable task
* @throws RejectedExecutionException if this task cannot be
* accepted for execution
* @throws NullPointerException if command is null
*/
void execute(Runnable command);
}

execute(Runnable command) 方法负责执行提交的任务,Executor 接口将任务的提交,任务的执行,以及线程使用的细节进行解耦。隐藏了创建线程的操作,甚至可以实现为非异步的方式,即由调用线程来直接执行:

1
2
3
4
5
class DirectExecutor implements Executor {
public void execute(Runnable r) {
r.run();
}
}

但是,通常情况下,是由调用该方法线程以外的线程来执行的,也就是会为每一个 Runnable 任务(命令)创建一个线程来异步执行:

1
2
3
4
5
class ThreadPerTaskExecutor implements Executor {
public void execute(Runnable r) {
new Thread(r).start();
}
}

属于多线程设计模式 Thread-Per-Message(见《图解 Java 多线程设计模式》) 的实现,即为每个请求分配一个新线程,由这个线程来执行处理。

该模式具有以下特点:

  1. 提高方法的响应,缩短延迟时间
  2. 适用于对操作顺序没有要求(即方法的调用顺序不一定和执行顺序一致)
  3. 适用于不需要返回值(execute方法的返回类型为 void

1
2