配置网络与SSH

[TOC]

网络配置

vmware 桥接模式下:

各种网络模式参考 https://www.linuxidc.com/Linux/2016-09/135521.htm

/etc/sysconfig/network-scripts 下一般会有一个网络配置文件,如:ifcfg-eno16777736

修改该文件:

1
2
3
4
5
6
7
8
9
10
11
12
13
14
15
16
17
18
19
20
TYPE=Ethernet          
BOOTPROTO=static #静态IP地址配置
DEFROUTE=yes
PEERDNS=yes
PEERROUTES=yes
IPV4_FAILURE_FATAL=no
IPV6INIT=yes
IPV6_AUTOCONF=yes
IPV6_DEFROUTE=yes
IPV6_PEERDNS=yes
IPV6_PEERROUTES=yes
IPV6_FAILURE_FATAL=no
NAME=eno16777736
UUID=7617ff93-0c8f-4272-a28e-ac8cf0807026
DEVICE=eno16777736
ONBOOT=yes
IPADDR=192.168.2.110 #虚拟机的话,与主机同一网段
NETMASK=255.255.255.0 #子网掩码
GATEWAY=192.168.2.1 #网关
DNS1=192.168.2.1 #DNS

修改完重启

1
2
/etc/init.d/network restart
service network restart

CentOS中修改主机名

CentOS 6
1
2
3
4
5
6
7
8
9
10
11
[root@centos6 ~]$ hostname                                              # 查看当前的hostnmae
centos6.magedu.com
[root@centos6 ~]$ vim /etc/sysconfig/network # 编辑network文件修改hostname行(重启生效)
[root@centos6 ~]$ cat /etc/sysconfig/network # 检查修改
NETWORKING=yes
HOSTNAME=centos66.magedu.com
[root@centos6 ~]$ hostname centos66.magedu.com # 设置当前的hostname(立即生效)
[root@centos6 ~]$ vim /etc/hosts # 编辑hosts文件,给127.0.0.1添加hostname
[root@centos6 ~]$ cat /etc/hosts # 检查
127.0.0.1 localhost localhost.localdomain localhost4 localhost4.localdomain4 centos66.magedu.com
::1 localhost localhost.localdomain localhost6 localhost6.localdomain6

centos6以及其他有些发行版本,主机名的配置文件是/etc/sysconfig/network, 用 hostname newname 也只是暂时生效,修改了内核的值,重启丢失。 所以可以结合临时加修改配置文件这种方式修改主机名。

CentOS 7
1
2
3
4
5
6
7
8
9
[root@centos7 ~]$ hostnamectl set-hostname centos77.magedu.com       # 使用这个命令会立即生效且重启也生效

[root@centos7 ~]$ hostname # 查看下
centos77.magedu.com

[root@centos7 ~]$ vim /etc/hosts # 编辑下hosts文件, 给127.0.0.1添加hostname
[root@centos7 ~]$ cat /etc/hosts # 检查
127.0.0.1 localhost localhost.localdomain localhost4 localhost4.localdomain4 centos77.magedu.com
::1 localhost localhost.localdomain localhost6 localhost6.localdomain6

在centos7中,主机名的配置文件为 /etc/hostname, 在该文件中配置了新的主机名后,不会立即生效,需要重启进行生效;因为系统内核已经中的主机名还没有更新,还是旧的指。 可以使用修改CentOS6的策略,也可以通过 hostnamectl set-hostname newname 来更改主机名,内核和配置文件中的主机名都被更新了,不用重启。

至于/etc/hosts 文件,同Windows下的hosts文件一样,只是起到本地DNS的作用一样,路由的作用。或者也可以说起别名。

SSH 服务配置

首先查看是否有安装

1
yum list installed | grep openssh-server

没有安装的话,用yum进行安装 yum install openssh-server

SSH 服务的配置文件是 /etc/ssh/sshd_config

1
2
3
4
5
6
7
Port 22
ListenAddress 0.0.0.0
ListenAddress ::

PermitRootLogin yes

PasswordAuthentication yes

重启或开启SSH服务

1
2
systemctl restart sshd.service
systemctl enable sshd.service #自启动服务

查看22端口

1
2
3
yum instatll net-tools –y    #如果没有netstat服务,安装netstat工具

netstat -an | grep 22

必要时关闭防火墙或开放22端口

1
2
systemctl stop firewalld.service
systemctl disable firewalld.service

ssh-keygen -t rsa -b 2048 -f /etc/ssh/ssh_host_rsa_key

RPM

https://www.cnblogs.com/zengkefu/p/5666947.html

ntpdate cn.pool.ntp.org

\1. 安装ntpdate工具

# yum -y install ntp ntpdate

\2. 设置系统时间与网络时间同步

# ntpdate cn.pool.ntp.org

\3. 将系统时间写入硬件时间

# hwclock –systohc

4.强制系统时间写入CMOS中防止重启失效

  hwclock -w
  或clock -w

本文来自 紫漪 的CSDN 博客 ,全文地址请点击:https://blog.csdn.net/u011391839/article/details/62892020?utm_source=copy

sudo passwd root 更改密码,要在root用户下

sudo su - root

apt list –installed|grep jdk java

/opt/zookeeper-3.4.6/bin/zkServer.sh start

/opt/kafka_2.11-0.9.0.1/bin/kafka-server-start.sh -daemon /opt/kafka_2.11-0.9.0.1/config/server.properties

/opt/kafka_2.11-0.9.0.1/bin/kafka-server-stop.sh

bin/kafka-console-producer.sh –broker-list localhost:9092 –topic test

1
bin/kafka-console-consumer.sh --zookeeper localhost:2181 --topic test1 --from-beginning

Spring Aysnc Request

Compare to WebFlux

Servlet API 最初是为通过 Filter-Servlet 链进行单次传递而构建的。 Servlet 3.0 中添加的异步请求处理允许应用程序退出 Filter-Servlet 链,但将响应保持打开状态以供进一步处理。 Spring MVC 异步支持是围绕该机制构建的。当控制器返回 DeferredResult 时,Filter-Servlet 链退出,Servlet 容器线程被释放。稍后,当设置了 DeferredResult 时,会进行 ASYNC 分派 (dispatch)(到相同的 URL),在此期间再次映射控制器,但不是调用它,而是使用 DeferredResult 值(就像控制器返回它一样)来恢复处理.

相比之下,Spring WebFlux 既不是建立在 Servlet API 上,也不需要这样的异步请求处理特性,因为它是异步设计的。异步处理内置于所有框架契约中,并且在请求处理的所有阶段都得到内在的支持。

从编程模型的角度来看,Spring MVC 和 Spring WebFlux 都支持异步和响应式类型作为控制器方法中的返回值。 Spring MVC 甚至支持流,包括反应式背压。但是,对响应的单个写入仍然是阻塞的(并且在单独的线程上执行),这与 WebFlux 不同,后者依赖于非阻塞 I/O,并且每次写入不需要额外的线程。

另一个根本区别是 Spring MVC 不支持控制器方法参数中的异步或反应类型(例如,@RequestBody、@RequestPart 等),也没有明确支持异步和反应类型作为模型属性。 Spring WebFlux 确实支持所有这些。

CORS

出于安全原因,浏览器禁止对当前来源之外的资源进行 AJAX 调用。 例如,您可以在一个选项卡中拥有您的银行帐户,而在另一个选项卡中拥有 evil.com。 来自 evil.com 的脚本不应该能够使用您的凭据向您的银行 API 发出 AJAX 请求 — 例如从您的帐户中取款!

跨域资源共享 (CORS) 是大多数浏览器实现的 W3C 规范,它允许您指定授权的跨域请求类型,而不是使用基于 IFRAME 或 JSONP 的安全性较低且功能较弱的解决方法。

CORS 规范区分了预检请求、简单请求和实际请求。要了解 CORS 的工作原理,您可以阅读本文等,或查看规范以获取更多详细信息。

Spring MVC HandlerMapping 实现为 CORS 提供了内置支持。成功将请求映射到处理程序后,HandlerMapping 实现会检查给定请求和处理程序的 CORS 配置并采取进一步行动。预检请求被直接处理,而简单和实际的 CORS 请求被拦截、验证,并设置了所需的 CORS 响应标头。

为了启用跨域请求(即 Origin 标头存在且与请求的主机不同),您需要有一些显式声明的 CORS 配置。如果未找到匹配的 CORS 配置,则拒绝预检请求。没有将 CORS 标头添加到简单和实际 CORS 请求的响应中,因此浏览器会拒绝它们。

每个 HandlerMapping 都可以使用基于 URL 模式的 CorsConfiguration 映射进行单独配置。在大多数情况下,应用程序使用 MVC Java 配置或 XML 命名空间来声明此类映射,这会导致将单个全局映射传递给所有 HandlerMappping 实例。

您可以将 HandlerMapping 级别的全局 CORS 配置与更细粒度的处理程序级别 CORS 配置相结合。例如,带注释的控制器可以使用类或方法级别的 @CrossOrigin 注释(其他处理程序可以实现 CorsConfigurationSource)。

结合全局和局部配置的规则一般是相加的 —— 例如,所有全局和所有本地起源。对于那些只能接受单个值的属性,例如allowCredentials 和 maxAge,本地覆盖全局值。有关更多详细信息,请参阅 CorsConfiguration#combine(CorsConfiguration)。

HandlerInterceptor

允许自定义处理程序执行链的工作流接口。应用程序可以为某些处理程序组注册任意数量的现有或自定义拦截器,以添加常见的预处理行为,而无需修改每个处理程序实现。
HandlerInterceptor 在适当的 HandlerAdapter 触发处理程序本身的执行之前被调用。这种机制可以用于预处理方面的大领域,例如用于授权检查或常见的处理程序行为,如语言环境或主题更改。它的主要目的是允许分解出重复的处理程序代码。

在异步处理场景中,处理程序可能会在单独的线程中执行,而主线程退出而不呈现或调用 postHandle 和 afterCompletion 回调。当并发处理程序执行完成时,请求被分派回来以继续渲染模型,并再次调用此合约的所有方法。有关更多选项和详细信息,请参阅 org.springframework.web.servlet.AsyncHandlerInterceptor

通常每个 HandlerMapping bean 定义一个拦截器链,共享它的粒度。为了能够将某个拦截器链应用于一组处理程序,需要通过一个 HandlerMapping bean 映射所需的处理程序。

拦截器本身被定义为应用程序上下文中的 bean,映射 bean 定义通过其“拦截器”属性(在 XML 中:)引用。

HandlerInterceptor 基本上类似于 Servlet 过滤器,但与后者相反,它只允许自定义预处理和禁止执行处理程序本身的选项,以及自定义后处理。过滤器更强大,例如它们允许交换传递给链的请求和响应对象。请注意,过滤器在 web.xml 中配置,即应用程序上下文中的 HandlerInterceptor。

作为基本准则,与细粒度处理程序相关的预处理任务是 HandlerInterceptor 实现的候选对象,尤其是分解出的公共处理程序代码和授权检查。另一方面,过滤器非常适合请求内容和视图内容处理,例如多部分表单和 GZIP 压缩。这通常显示何时需要将过滤器映射到某些内容类型(例如图像)或所有请求。

WebMvcConfigurer

Spring Initialization

1
ApplicationContextInitializer
1
2
3
4
5
6
The context may or may not yet be refreshed. If it (a) is an implementation of ConfigurableWebApplicationContext and (b) has not already been refreshed (the recommended approach), then the following will occur:
If the given context has not already been assigned an id, one will be assigned to it
ServletContext and ServletConfig objects will be delegated to the application context
customizeContext will be called
Any ApplicationContextInitializer org.springframework.context.ApplicationContextInitializer ApplicationContextInitializers specified through the "contextInitializerClasses" init-param will be applied.
refresh() will be called
image-20210801120000817

Spring 事务

一些简称或术语

JTA Java Transaction API

EJB Enterprise Java Beans

CMT Container Managed Transaction

*JMS * Java Message Service

*JCA * Java EE Connector Architecture

weave byte code modifition 字节码修改来增强类,提供切面,与基于代理的切面是完全不同的一种方式

Spring 框架的事务抽象

TransactionManager

TransactionManager: 定义事务策略,例如,用于命令式事务管理的 org.springframework.transaction.PlatformTransactionManager 接口或者用于响应式事务管理的 org.springframework.transaction.ReactiveTransactionManager 接口

1
2
3
4
5
6
7
8
public interface PlatformTransactionManager extends TransactionManager {

TransactionStatus getTransaction(TransactionDefinition definition) throws TransactionException;

void commit(TransactionStatus status) throws TransactionException;

void rollback(TransactionStatus status) throws TransactionException;
}

TransactionDefinition

TransactionDefinition: 定义事务的传播行为、隔离级别、超时时间、只读状态

传播行为(Propagation):

隔离级别(Isolation):

超时时间(Timeout):

只读状态(read-only):

1
2
3
4
5
6
7
8
9
10
11
12
13
14
15
16
17
18
19
20
21
22
23
24
25
26
27
28
29
30
31
32
33
34
35
36
37
38
39
40
41
public interface TransactionDefinition {
int PROPAGATION_REQUIRED = 0;
int PROPAGATION_SUPPORTS = 1;
int PROPAGATION_MANDATORY = 2;
int PROPAGATION_REQUIRES_NEW = 3;
int PROPAGATION_NOT_SUPPORTED = 4;
int PROPAGATION_NEVER = 5;
int PROPAGATION_NESTED = 6;
int ISOLATION_DEFAULT = -1;
int ISOLATION_READ_UNCOMMITTED = 1; // same as java.sql.Connection.TRANSACTION_READ_UNCOMMITTED;
int ISOLATION_READ_COMMITTED = 2; // same as java.sql.Connection.TRANSACTION_READ_COMMITTED;
int ISOLATION_REPEATABLE_READ = 4; // same as java.sql.Connection.TRANSACTION_REPEATABLE_READ;
int ISOLATION_SERIALIZABLE = 8; // same as java.sql.Connection.TRANSACTION_SERIALIZABLE;
int TIMEOUT_DEFAULT = -1;

default int getPropagationBehavior() {
return PROPAGATION_REQUIRED;
}

default int getIsolationLevel() {
return ISOLATION_DEFAULT;
}

default int getTimeout() {
return TIMEOUT_DEFAULT;
}

default boolean isReadOnly() {
return false;
}

@Nullable
default String getName() {
return null;
}

static TransactionDefinition withDefaults() {
return StaticTransactionDefinition.INSTANCE;
}

}

TransactionStatus

TransactionStatus :为使用事务性的代码来控制事务的执行和查询事务状态提供了一种简单的方式。

1
2
3
4
5
6
7
8
9
10
11
12
13
14
15
16
17
18
public interface TransactionStatus extends TransactionExecution, SavepointManager, Flushable {

@Override
boolean isNewTransaction();

boolean hasSavepoint();

@Override
void setRollbackOnly();

@Override
boolean isRollbackOnly();

void flush();

@Override
boolean isCompleted();
}

声明式事务管理

While the Spring default behavior for declarative transaction management follows EJB convention (roll back is automatic only on unchecked exceptions), it is often useful to customize this behavior.

Using @Transactional

https://docs.spring.io/spring/docs/current/spring-framework-reference/data-access.html#transaction-declarative-annotations

You can apply the @Transactional annotation to an interface definition, a method on an interface, a class definition, or a public method on a class. However, the mere presence of the @Transactional annotation is not enough to activate the transactional behavior. The @Transactional annotation is merely metadata that can be consumed by some runtime infrastructure that is @Transactional-aware and that can use the metadata to configure the appropriate beans with transactional behavior. In the preceding example, the <tx:annotation-driven/> element switches on the transactional behavior.

@Transactional 注解只是配置事务行为的元数据,并不会激活这些事务行为,Spring 的事务框架会使用这些元数据为某些 bean 配置它们的事务行为,xml 文件中的 <tx:annotation-driven/> 和配置类(@Configuration)上的 @EnableTransactionManagement注解会激活这些事务行为。

@EnableTransactionManagement and <tx:annotation-driven/> looks for @Transactional only on beans in the same application context in which they are defined. This means that, if you put annotation-driven configuration in a WebApplicationContext for a DispatcherServlet, it checks for @Transactional beans only in your controllers and not your services. See MVC for more information.

@EnableTransactionManagement and <tx:annotation-driven/> 只会在定义它们本身的上下文中寻找 @Transactional 注解的 bean, 如果是在 Web 应用的 DispatcherServlet 对应的 WebApplicationContext @EnableTransactionManagement and <tx:annotation-driven/>只会在这个上下文中查找,这个上下文一般只会定义控制器以及试图解析器等 web 组件,而不是 service 类。

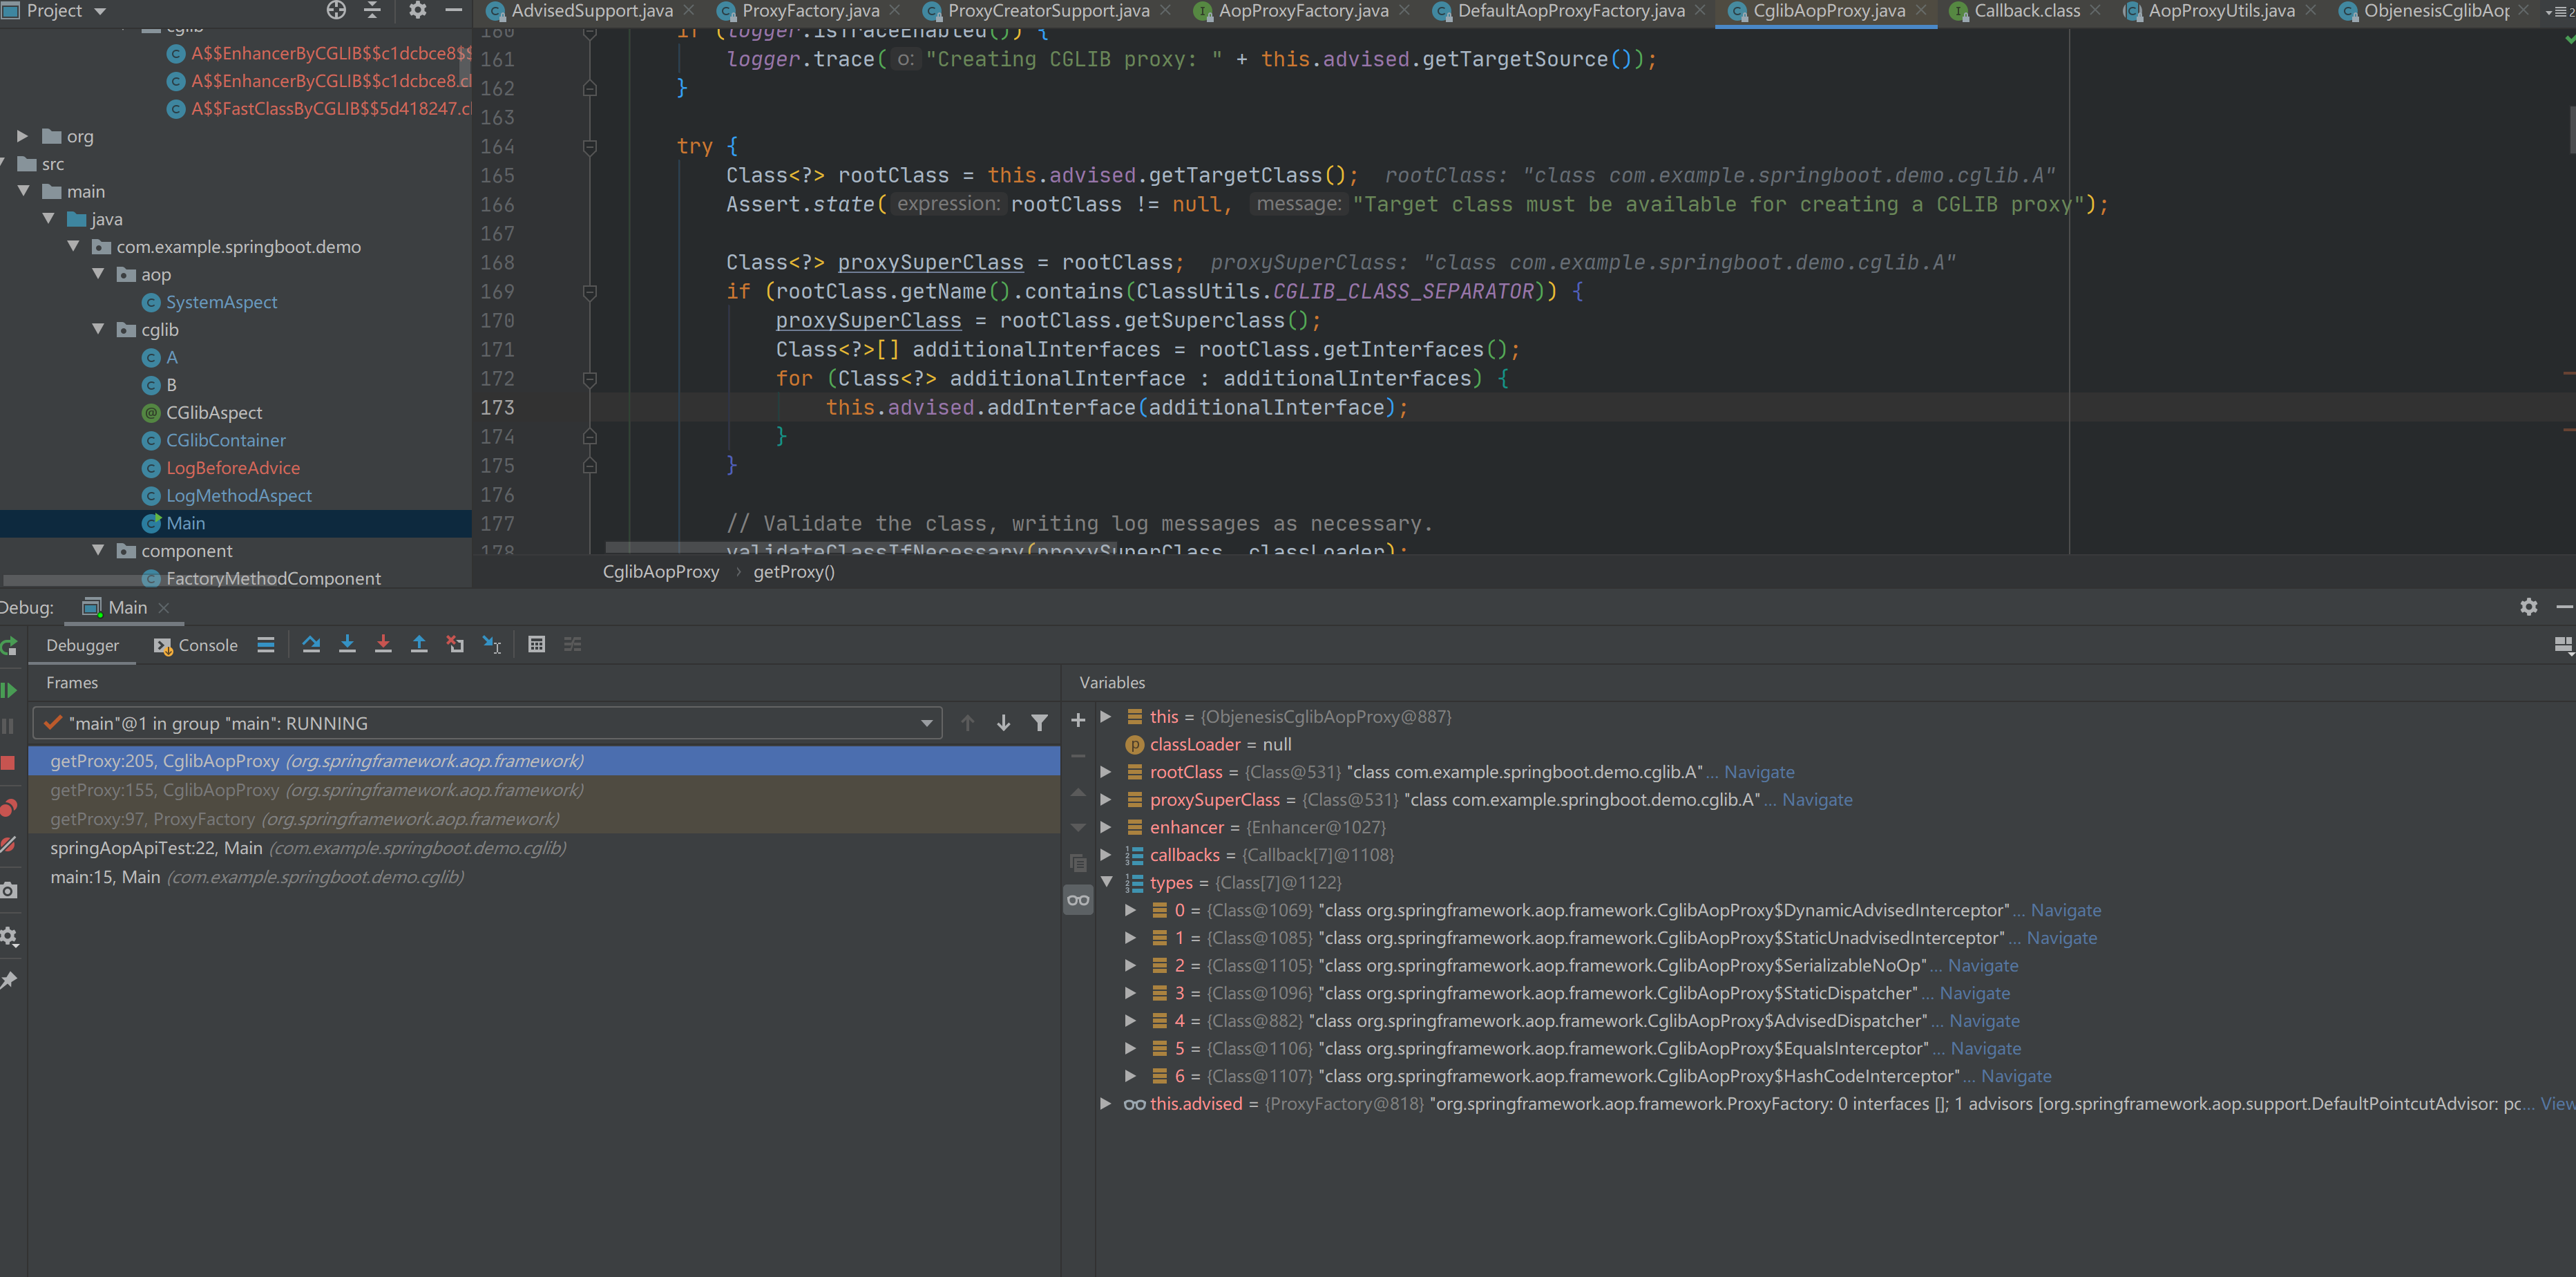
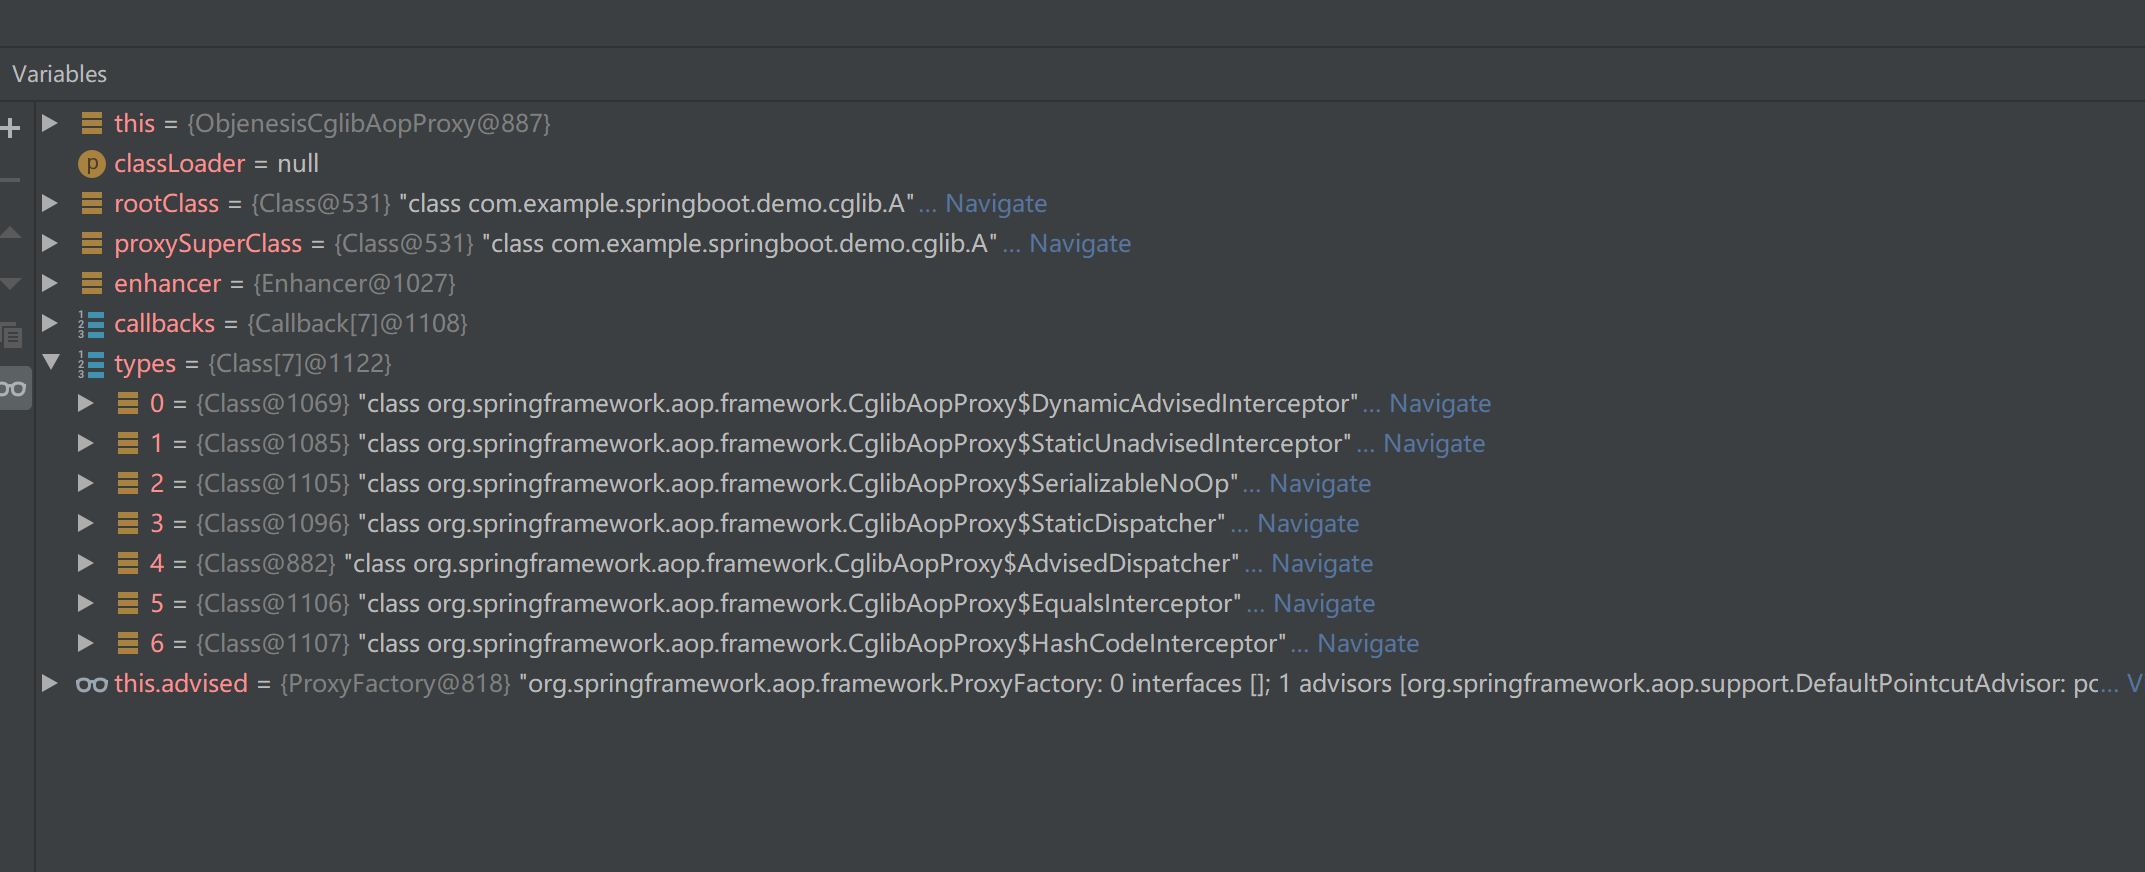
In proxy mode (which is the default), only external method calls coming in through the proxy are intercepted. This means that self-invocation (in effect, a method within the target object calling another method of the target object) does not lead to an actual transaction at runtime even if the invoked method is marked with @Transactional. Also, the proxy must be fully initialized to provide the expected behavior, so you should not rely on this feature in your initialization code (that is, @PostConstruct).

由于 Spring 事务是基于代理的,只有通过代理的外部方法调用才会被拦截,目标对象内部的方法调用(一个方法调用对象内部的另一个方法)是不会在运行时导致一个实际的事务发生的;另外,必须完全初始化代理以提供预期的行为,因此不应在初始化代码(即@PostConstruct)中依赖此功能。

Consider using of AspectJ mode (see the mode attribute in the following table) if you expect self-invocations to be wrapped with transactions as well. In this case, there no proxy in the first place. Instead, the target class is woven (that is, its byte code is modified) to turn @Transactional into runtime behavior on any kind of method.

如果想要实现内部调用的事务行为,可以考虑基于 AspectJ 的 AOP, 首先,不会有代理,目标类被编织以将 @Transactional 的运行时行为应用于任何方法上

使用基于代理的事务的 proxy 类型

  • class-based proxies

  • standard JDK interface-based proxies (default or omitted)

@Transactional settings

默认的@Transactional 的设置:

  • The propagation setting is PROPAGATION_REQUIRED. # 默认的传播行为

  • The isolation level is ISOLATION_DEFAULT. # 默认的事务隔离级别

  • The transaction is read-write. # 模式是读-写的事务

  • The transaction timeout defaults to the default timeout of the underlying transaction system, or to none if timeouts are not supported. # 超时时间

  • Any RuntimeException triggers rollback, and any checked Exception does not. # 触发回滚的规则(异常类别)

    fully-qualified class name

编程式事务

使用 TransactionTemplate

TransactionTemplate 和 Spring 中其他模板类相似(如 JdbcTemplate),目的是为了减少应用代码中获取和释放事务相关资源的样板式代码

(boilerplate acquisition and release transactional resources),这样应用就可以将关注点放在业务逻辑上。它使用一个回调方法。

应用代码必须执行在一个事务上下文(transactional context)中, 并且使用 TransactionTemplate,仅需两个步骤:

  1. 应用代码编写 TransactionCallback 实现,这个实现中包含了事务要包含的所有的操作,通常是匿名内部类的形式 。
  2. 回调类实现的实例传入 TransactionTemplate.execute(CallBack) 方法中

示例代码:

1
2
3
4
5
6
7
8
9
10
11
12
13
14
15
16
17
18
19
20
public class SimpleService implements Service {

// single TransactionTemplate shared amongst all methods in this instance
private final TransactionTemplate transactionTemplate;

// use constructor-injection to supply the PlatformTransactionManager
public SimpleService(PlatformTransactionManager transactionManager) {
this.transactionTemplate = new TransactionTemplate(transactionManager);
}

public Object someServiceMethod() {
return transactionTemplate.execute(new TransactionCallback() {
// the code in this method executes in a transactional context
public Object doInTransaction(TransactionStatus status) {
updateOperation1();
return resultOfUpdateOperation2();
}
});
}
}

无返回的事务可以实现 TransactionCallbackWithoutResult 接口

事务的属性,如传播行为、隔离级别等可以通过 TransactionTemplate 提供的方法设置(程序中或XML中)

Code within the callback can roll the transaction back by calling the setRollbackOnly() method on the supplied TransactionStatus object, as follows:

也可以在回调方法中,调用 TransactionStatus.setRollbackOnly() 回滚事务, 这里取决于是否是新事务,来决定是否直接回滚。

1
2
3
4
5
6
7
8
9
10
11
transactionTemplate.execute(new TransactionCallbackWithoutResult() {

protected void doInTransactionWithoutResult(TransactionStatus status) {
try {
updateOperation1();
updateOperation2();
} catch (SomeBusinessException ex) {
status.setRollbackOnly();
}
}
});

使用 PlatformTransactionManager

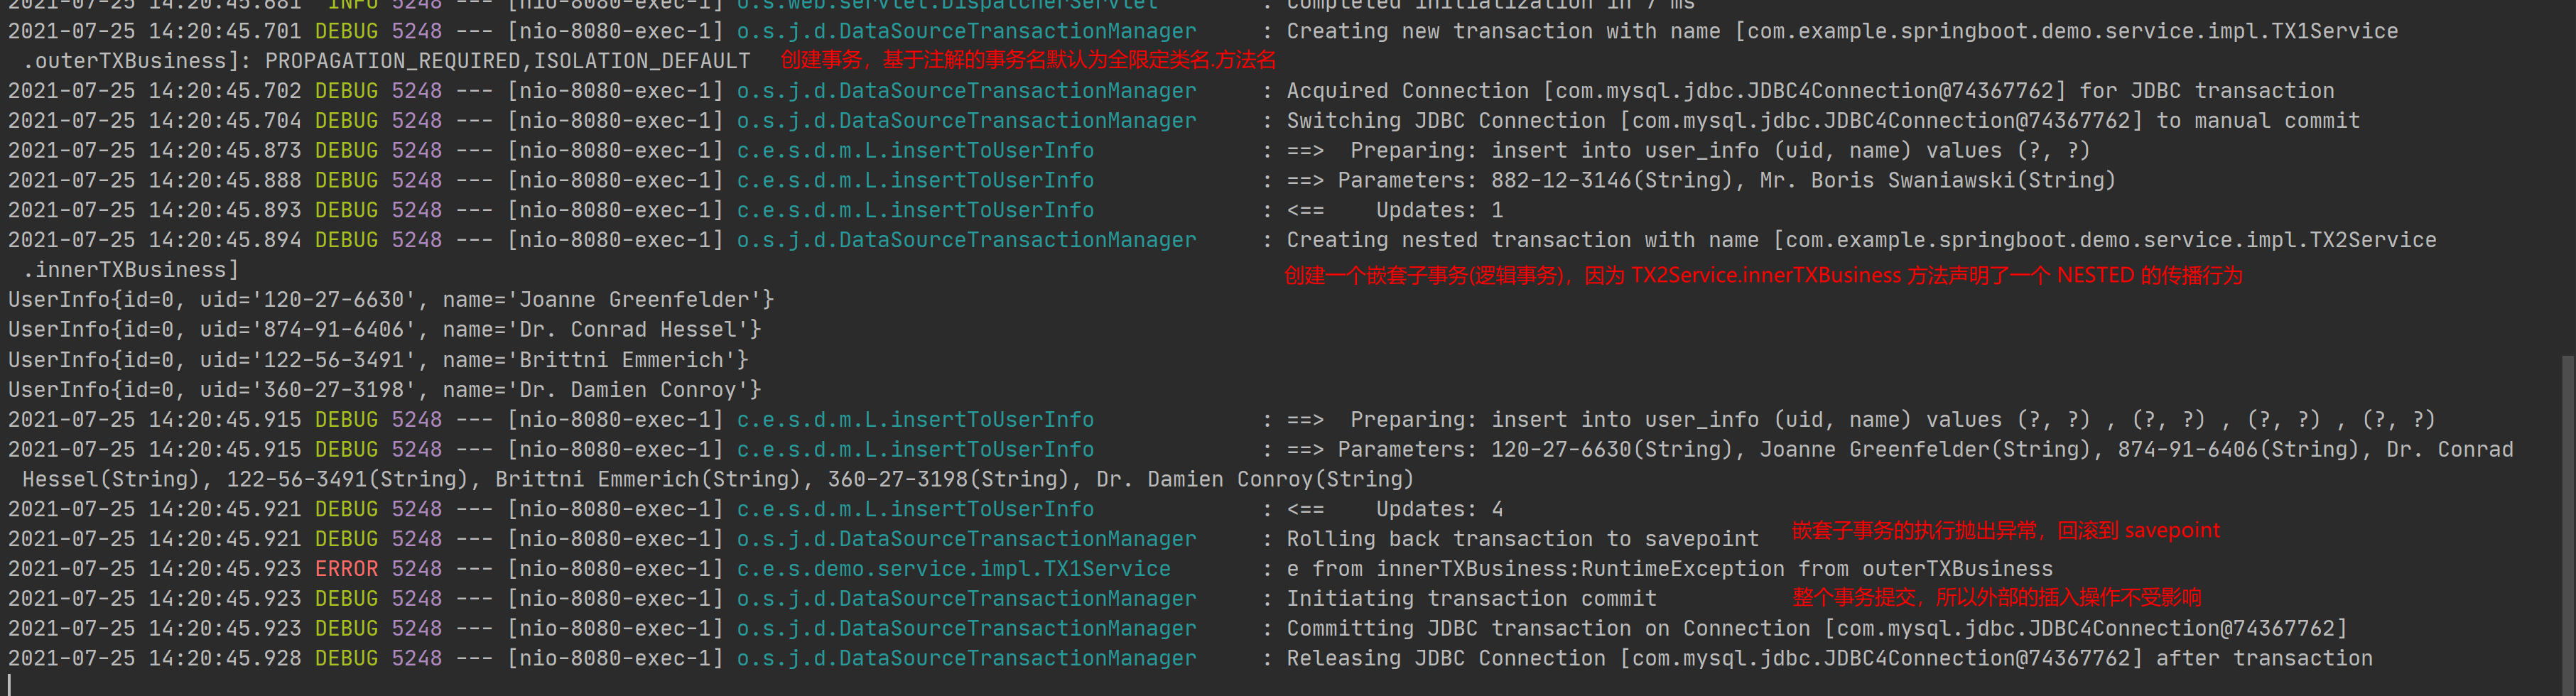
也可以提直接使用 PlatformTransactionManager 来管理事务,需要结合 Spring 事务抽象的其它对象: TransactionDefinition, TransactionStatus。 可以实现事务的初始化、回滚和提交。编程式事务也可以显示设置事务的名称,声明式的事务名称一般都是默认的全限定类名+方法名。

Java

1
2
3
4
5
6
7
8
9
10
11
12
13
14
DefaultTransactionDefinition def = new DefaultTransactionDefinition();
// explicitly setting the transaction name is something that can be done only programmatically
def.setName("SomeTxName");
def.setPropagationBehavior(TransactionDefinition.PROPAGATION_REQUIRED);

TransactionStatus status = txManager.getTransaction(def);
try {
// execute your business logic here
}
catch (MyException ex) {
txManager.rollback(status);
throw ex;
}
txManager.commit(status);

PlatformTransactionManager.rollback(TransactionStatus status) 方法有如下的注释:

Do not call rollback on a transaction if commit threw an exception. The transaction will already have been completed and cleaned up when commit returns, even in case of a commit exception. Consequently, a rollback call after commit failure will lead to an IllegalTransactionStateException.

不要在commit 时异常后进行回滚,commit 返回时(即使有提交异常),事务已经完成并且已经被清理。所以这时,如果调用 rollback 操作,会导致一个 IllegalTransactionStateException, 这也是上述示例代码中 commit 放在最后的原因

If the transaction wasn’t a new one, omit the commit for proper participation in the surrounding transaction.

当调用了 commit 后,如果该事务不是一个新事务,则会忽略提交以正确参与周围的事务中。

Spring 事务的传播行为

具体的传播行为定义见 Spring Transaction PropagationCSDN-事务属性之7种传播行为,不再赘述. 这里主要是对如何在 Spring 中验证这些传播行为的行为进行验证和说明:

假设想对 PROPAGATION_NESTED 嵌套事务传播行为进行验证, 首先需要设置对应的 TransactionManager 支持:

1
2
3
4
5
6
7
@Bean
public PlatformTransactionManager transactionManager(DataSource dataSource) {
DataSourceTransactionManager dataSourceTransactionManager = new DataSourceTransactionManager();
dataSourceTransactionManager.setDataSource(dataSource);
dataSourceTransactionManager.setNestedTransactionAllowed(true); // 允许嵌套事务
return dataSourceTransactionManager;
}

PROPAGATION_NESTED 这种传播行为只会有一个物理事务, 通过多个保存点的机制, 可以使得嵌套的内部事务实现部分回滚, 而不影响外部事务的回滚状态, 只不过时有些操作被回滚了.

错误的验证方式

接下来,可能想当然的在一个 Service 类中定义如下两个事务方法, 并指定事务的传播行为:

1
2
3
4
5
6
7
8
9
10
11
12
13
14
15
16
17
18
19
20
21
22
23
24
25
26
27
28
29
30
31
32
33
34
35
36
37
38
39
40
@Service
@Slf4j
public class TransactionTestService {

/*
* 注入对应 DAO 类,进行实际的数据库访问
*/
@Resource
private LearnSqlMapper sqlMapper;

/*
* 第一个事务性的方法, 使用默认的传播行为,即 REQUIRED, 不存在事务时会创建一个新的事务.
* 在当前方法中会调用第二个事务性方法,它的传播行为为 NESTED
*/
@Transactional(propagation = Propagation.REQUIRED)
public void outerTXBusiness() {
UserInfo userInfo = new UserInfo(FakerUtil.getRandomId(), FakerUtil.getRandomName());
System.out.println(userInfo);
sqlMapper.insertToUserInfo(Collections.singletonList(userInfo));

// 调用第二个事务性的方法
innerTXBusiness();
}

/*
* 第二个事务性的方法, 传播行为指定为 NESTED, 期望以一个嵌套子事务(逻辑事务)运行在已经存在的事务中
*/
@Transactional(propagation = Propagation.NESTED)
public void innerTXBusiness() {
System.out.println("innerTXBusiness:" + this.getClass());
List<UserInfo> userInfos = IntStream.rangeClosed(1, 4)
.mapToObj(i -> new UserInfo(FakerUtil.getRandomId(), FakerUtil.getRandomName()))
.collect(Collectors.toList());
userInfos.forEach(System.out::println);
sqlMapper.insertToUserInfo(userInfos);

// 这里抛出一个 DataAccessException 或其它 RuntimeExcpetion 期望进行此嵌套子事务可以回滚到 savepoint
throw new BadSqlGrammarException("task", "sql", null);
}
}

当在其它的 bean 中调用 TransactionTestService bean 的 outerTXBusiness 方法时, 会发现 outerTXBusinessinnerTXBusiness 中所有的操作都被回滚了, 不是预期的 NESTED 传播行为 (内部的嵌套子事务的回滚, 只是回滚到执行前的一个 savepoint, 并不会导致整个事务回滚), 预期中, outerTXBusiness 中的插入数据库操作不会被回滚的.

造成这种现象的原因其实也很简单, 因为 innerTXBusiness 方法根本没有被应用事务的切面通知 (advice, 或者说拦截), 因为属于方法内部调用, 基于代理的 Spring AOP 是不会对这种内部调用应用事务通知的 (Spring 事务是基于 AOP 的).

正确的验证方式

要进行验证, 可以使用三种方式:

  1. 切换 Spring AOP 使用 AspectJ 集成 (方法内的调用可以被拦截),
  2. 继续使用基于代理的 Spring AOP, 将这两个事务性的方法声明在不同的 bean 中
  3. 继续使用基于代理的 Spring AOP, 使用编程式的事务管理

第一种就不做尝试了, 看下后面两种的实现:

将这两个事务性的方法声明在不同的 bean 中

1
2
3
4
5
6
7
8
9
10
11
12
13
14
15
16
17
18
19
20
21
22
23
@Service
@Slf4j
public class TX1Service {

@Resource
private LearnSqlMapper sqlMapper;

@Resource
private TX2Service tx2Service;

@Transactional(propagation = Propagation.REQUIRED)
public void outerTXBusiness() {
UserInfo userInfo = new UserInfo(FakerUtil.getRandomId(), FakerUtil.getRandomName());
sqlMapper.insertToUserInfo(Collections.singletonList(userInfo));

// 调用第二个事务性方法
try {
tx2Service.innerTXBusiness();
} catch (Exception e) {
log.error("e from innerTXBusiness:" + e.getMessage());
}
}
}
1
2
3
4
5
6
7
8
9
10
11
12
13
14
15
16
17
18
19
@Service
public class TX2Service {

@Resource
private LearnSqlMapper sqlMapper;

// 指定传播行为为 NESTED
@Transactional(propagation = Propagation.NESTED)
public void innerTXBusiness() {
List<UserInfo> userInfos = IntStream.rangeClosed(1, 4)
.mapToObj(i -> new UserInfo(FakerUtil.getRandomId(), FakerUtil.getRandomName()))
.collect(Collectors.toList());
userInfos.forEach(System.out::println);
sqlMapper.insertToUserInfo(userInfos);

// 抛出异常, 验证嵌套子事务回滚到 savepoint 的情况
throw new RuntimeException("RuntimeException from outerTXBusiness");
}
}

当在其它 bean 中 调用 TX1Service#outerTXBusiness() 时, 可以看到正确的行为, 即 TX2Service#innerTXBusiness() 中的操作被回滚, TX1Service#outerTXBusiness() 中的插入成功, 并没有影响外部事务的操作.

image-20210725142848456

1
2
3
4
5
6
7
8
9
10
11
12
13
14
15
16
17
18
19
2021-07-25 14:20:45.701 DEBUG 5248 --- [nio-8080-exec-1] o.s.j.d.DataSourceTransactionManager     : Creating new transaction with name [com.example.springboot.demo.service.impl.TX1Service.outerTXBusiness]: PROPAGATION_REQUIRED,ISOLATION_DEFAULT
2021-07-25 14:20:45.702 DEBUG 5248 --- [nio-8080-exec-1] o.s.j.d.DataSourceTransactionManager : Acquired Connection [com.mysql.jdbc.JDBC4Connection@74367762] for JDBC transaction
2021-07-25 14:20:45.704 DEBUG 5248 --- [nio-8080-exec-1] o.s.j.d.DataSourceTransactionManager : Switching JDBC Connection [com.mysql.jdbc.JDBC4Connection@74367762] to manual commit
2021-07-25 14:20:45.873 DEBUG 5248 --- [nio-8080-exec-1] c.e.s.d.m.L.insertToUserInfo : ==> Preparing: insert into user_info (uid, name) values (?, ?)
2021-07-25 14:20:45.888 DEBUG 5248 --- [nio-8080-exec-1] c.e.s.d.m.L.insertToUserInfo : ==> Parameters: 882-12-3146(String), Mr. Boris Swaniawski(String)
2021-07-25 14:20:45.893 DEBUG 5248 --- [nio-8080-exec-1] c.e.s.d.m.L.insertToUserInfo : <== Updates: 1
2021-07-25 14:20:45.894 DEBUG 5248 --- [nio-8080-exec-1] o.s.j.d.DataSourceTransactionManager : Creating nested transaction with name [com.example.springboot.demo.service.impl.TX2Service.innerTXBusiness]
UserInfo{id=0, uid='120-27-6630', name='Joanne Greenfelder'}
UserInfo{id=0, uid='874-91-6406', name='Dr. Conrad Hessel'}
UserInfo{id=0, uid='122-56-3491', name='Brittni Emmerich'}
UserInfo{id=0, uid='360-27-3198', name='Dr. Damien Conroy'}
2021-07-25 14:20:45.915 DEBUG 5248 --- [nio-8080-exec-1] c.e.s.d.m.L.insertToUserInfo : ==> Preparing: insert into user_info (uid, name) values (?, ?) , (?, ?) , (?, ?) , (?, ?)
2021-07-25 14:20:45.915 DEBUG 5248 --- [nio-8080-exec-1] c.e.s.d.m.L.insertToUserInfo : ==> Parameters: 120-27-6630(String), Joanne Greenfelder(String), 874-91-6406(String), Dr. Conrad Hessel(String), 122-56-3491(String), Brittni Emmerich(String), 360-27-3198(String), Dr. Damien Conroy(String)
2021-07-25 14:20:45.921 DEBUG 5248 --- [nio-8080-exec-1] c.e.s.d.m.L.insertToUserInfo : <== Updates: 4
2021-07-25 14:20:45.921 DEBUG 5248 --- [nio-8080-exec-1] o.s.j.d.DataSourceTransactionManager : Rolling back transaction to savepoint
2021-07-25 14:20:45.923 ERROR 5248 --- [nio-8080-exec-1] c.e.s.demo.service.impl.TX1Service : e from innerTXBusiness:RuntimeException from outerTXBusiness
2021-07-25 14:20:45.923 DEBUG 5248 --- [nio-8080-exec-1] o.s.j.d.DataSourceTransactionManager : Initiating transaction commit
2021-07-25 14:20:45.923 DEBUG 5248 --- [nio-8080-exec-1] o.s.j.d.DataSourceTransactionManager : Committing JDBC transaction on Connection [com.mysql.jdbc.JDBC4Connection@74367762]
2021-07-25 14:20:45.928 DEBUG 5248 --- [nio-8080-exec-1] o.s.j.d.DataSourceTransactionManager : Releasing JDBC Connection [com.mysql.jdbc.JDBC4Connection@74367762] after transaction

通过代码显示控制事务的执行

1
2
3
4
5
6
7
8
9
10
11
12
13
14
15
16
17
18
19
20
21
22
23
24
25
26
27
28
29
30
31
32
33
34
35
36
37
38
39
40
41
42
43
44
45
46
47
48
49
50
51
52
53
54
55
56
57
58
59
60
61
62
63
64
65
66
67
68
69
70
71
72
73
74
75
76
77
78
79
80
81
82
83
84
85
86
87
@Service
@Slf4j
public class TransactionTestService {

@Resource
private LearnSqlMapper sqlMapper;

@Resource
private PlatformTransactionManager transactionManager;

public void outerBiz1() {
UserInfo userInfo = new UserInfo(FakerUtil.getRandomId(), FakerUtil.getRandomName());
sqlMapper.insertToUserInfo(Collections.singletonList(userInfo));
}

public void outerBiz2() {
throw new BadSqlGrammarException("task", "sql", null);
}

public void innerBiz() {
List<UserInfo> userInfos = IntStream.rangeClosed(1, 4)
.mapToObj(i -> new UserInfo(FakerUtil.getRandomId(), FakerUtil.getRandomName()))
.collect(Collectors.toList());
userInfos.forEach(System.out::println);
sqlMapper.insertToUserInfo(userInfos);
// throw new BadSqlGrammarException("task", "sql", null);
}

/**
* 通过显示的代码来控制事务的执行,来验证事务的传播行为
*/
public void nestedTXTest() {
TransactionDefinition outerTXDef = createTXDefinition("OuterTX", TransactionDefinition.PROPAGATION_REQUIRED);
TransactionStatus outerStatus = transactionManager.getTransaction(outerTXDef);
try {
txExecute(outerStatus, () -> {
outerBiz1();

innerTXOperation();

outerBiz2();
});
} catch (Exception e) {
log.error("OuterTX exception", e);
}
}

private void innerTXOperation() {
TransactionDefinition innerTXDef = createTXDefinition("InnerTX", TransactionDefinition.PROPAGATION_NESTED);
TransactionStatus innerStatus = transactionManager.getTransaction(innerTXDef);
try {
innerBiz();
} catch (Exception e) {
log.error(e.getMessage() + " from innerTXOperation");
transactionManager.rollback(innerStatus);
return;
}
// 当调用了 commit 后,如果该事务不是一个新事务,则会忽略提交以正确参与周围的事务中
transactionManager.commit(innerStatus);
}

@FunctionalInterface
interface TXOperation {
void apply();
}

public void txExecute(TransactionStatus status, TXOperation txOperations) throws Exception {
try {
txOperations.apply();
} catch (Exception ex) {
transactionManager.rollback(status);
throw ex;
}

// 当调用了 commit 后,如果该事务不是一个新事务,则会忽略提交以正确参与周围的事务中
// 所以按照模板式的使用就可以了,不必关心如何参与到已经存在的事务中,只需要定义正确的 TransactionDefinition (包括传播行为,隔离级别等)
transactionManager.commit(status);
}

public TransactionDefinition createTXDefinition(String name, int propagation) {
DefaultTransactionDefinition definition = new DefaultTransactionDefinition();
definition.setName(name);
definition.setPropagationBehavior(propagation);
definition.setIsolationLevel(TransactionDefinition.ISOLATION_DEFAULT);
return definition;
}
}

参考阅读

[1] Data Access (spring.io)

[2] CSDN-事务的传播行为