Spring 作用域

Scoped Beans as Dependencies

1
2
3
4
5
6
7
8
9
10
11
12
13
@Slf4j
@Component
@RequestScope
public class RequestScopeEntity {

public RequestScopeEntity() {
log.info("############ Create RequestScopeEntity ############");
}

public void doRequestBusiness() {
log.info(Thread.currentThread() + " do current request business");
}
}
1
2
3
4
5
6
7
8
9
10
11
12
13
14
15
16
17
18
19
20
21
22
@Slf4j
@RestController
@RequestMapping("scope2")
public class ScopeController2 {

/**
* 实际注入的是 Spring CGLIB 为 RequestScopeEntity 创建的一个代理对象,
* 可以通过打印该对象的 Class 对象的名称来验证,针对每个请求,都会创建一个
* 实际的 RequestScopeEntity 对象,然后将对这个代理对象方法的调用委托给
* 新创建的 RequestScopeEntity 对象
*/
@Autowired
private RequestScopeEntity requestScopeEntity;

@GetMapping("user")
public String userInfo() {
requestScopeEntity.doRequestBusiness();
int scopeEntityHash = requestScopeEntity.hashCode();
log.info("[scope2], requestScopeEntity:[{}], class:[{}]", scopeEntityHash, requestScopeEntity.getClass().getSimpleName());
return scopeEntityHash;
}
}

注入点可以声明为 ObjectFactory<MyTargetBean>, 或者是 Provider<MyTargetBean>Provider<MyTargetBean> (JSR330)

代理模式,装饰器模式,适配器模式

Spring Enviroment

Spring Environment

Environment 是对 Spring 应用环境 (Spring Application Environment) 的抽象; 应用于应用环境的两个方面:profiles 以及 properties

Bean Definition Profiles

profiles 属于条件化创建 bean 的一种机制, 不同的 profile 包含了一组 bean 的定义,运行时,可以指定激活哪些 profile (spring.profiles.active), 以及应用哪些默认的 profile (spring.profiles.default),当激活这些 profiles 时,它们包含的 bean 定义会被注册到容器中。

这种机制的使用想必大家已经比较熟悉,关于细节,需要注意的就是 @Profile 注解,背后依赖的是 @Conditional 作为元注解 (我这里是 Spring 4.1.6 版本),@Conditional 注解是 Spring 为条件化创建 bean 提供的一种机制,需要提供一个 org.springframework.context.annotation.Condition 的实现类作为判断的依据。

@Profile 源码:

1
2
3
4
5
6
7
8
9
10
11
12
@Target({ElementType.TYPE, ElementType.METHOD})
@Retention(RetentionPolicy.RUNTIME)
@Documented
@Conditional(ProfileCondition.class)
public @interface Profile {

/**
* The set of profiles for which the annotated component should be registered.
*/
String[] value();

}

ProfileCondition 源码

1
2
3
4
5
6
7
8
9
10
11
12
13
14
15
16
17
18
19
20
21
class ProfileCondition implements Condition {

@Override
public boolean matches(ConditionContext context, AnnotatedTypeMetadata metadata) {
if (context.getEnvironment() != null) {
MultiValueMap<String, Object> attrs = metadata.getAllAnnotationAttributes(Profile.class.getName());
if (attrs != null) {
// 获取 @Profile 注解中的 value 属性值,即 bean 定义时指定所属的 profiles
for (Object value : attrs.get("value")) {
// 判断是否激活
if (context.getEnvironment().acceptsProfiles(((String[]) value))) {
return true;
}
}
return false;
}
}
return true;
}

}

@Profile 的属性值支持表达式

  • ! 逻辑非
  • & 逻辑与
  • | 逻辑或

* &| 的组合使用需要使用括号:production & (us-east | eu-central)

@Profile 注解作为元注解创建自定义注解

1
2
3
4
5
6
@Target(ElementType.TYPE)
@Retention(RetentionPolicy.RUNTIME)
@Profile("production")
public @interface Production {

}

Properties

properties 包含了应用用到的所有属性对,可能来源于(不限于):

  • properties 文件
  • JVM 系统属性 (JVM System Properties)
  • 系统环境变量 (System Environment Variables)
  • JNDI
  • Servlet Context Parameters
  • 临时属性对象 (ad-hoc Properties object)
  • Map 对象

Environment 的作用就是为用户提供一个便利的服务接口用来配置属性源(property sources)以及从中解析属性值,属性源可配置, 并具有层次结构。

PropertySource

PropertySource 是对任何键值对的属性源的一种抽象,Spring 提供的 StandardEnvironment (在 standalone 模式下使用) 会配置两个 PropertySource 对象,分别代表 JVM 系统属性的集合( System.getProperties() )和系统环境变量 (System.getenv()

Environment 对象提供了配置 PropertySource 以及在这些 PropertySource 对象上的检索功能,检索某个属性键是否存在或者对应的值。

Spring Web 应用中, StandardServletEnvironment 实现,检索的优先级如下:

  1. ServletConfig parameters
  2. ServletContext parameters ( web.xml context-param entries )
  3. JNDI environment variables (java:comp/env/ entries)
  4. JVM system properties (-D command-line arguments)
  5. JVM system environment (operating system environment variables)

整个机制是可配置的, 可以移除某个 PropertySource ,或者改变检索的优先级

1
2
3
4
5
6
7
ConfigurableApplicationContext ctx = new GenericApplicationContext();

// MutablePropertySources api exposes a number of methods that allow for precise manipulation of the set of property sources
MutablePropertySources sources = ctx.getEnvironment().getPropertySources();

// MyPropertySource is a custom PropertySource implementation
sources.addFirst(new MyPropertySource());

@PropertySource 注解

1
2
3
4
5
6
7
8
9
10
11
12
13
14
15
16
@Target(ElementType.TYPE)
@Retention(RetentionPolicy.RUNTIME)
@Documented
@Repeatable(PropertySources.class) // 允许重复使用
public @interface PropertySource {

String name() default "";

String[] value();

boolean ignoreResourceNotFound() default false;

String encoding() default "";

Class<? extends PropertySourceFactory> factory() default PropertySourceFactory.class;
}

@PropertySource 注解提供了一种向 Environment 添加属性源的便利方式,使用在 @Configuration 类上,需要提的一点是,任何出现在 @PropertySource属性源路径中的 ${..} 占位符会从已经注册的 PropertySource 中检索,也可以提供一个默认值,如 ${key:default}

1
2
3
4
5
6
7
8
9
10
11
12
13
14
@Configuration
@PropertySource("classpath:/com/myco/${spring.profiles.active:st}/app.properties")
public class AppConfig {

@Autowired
Environment env;

@Bean
public TestBean testBean() {
TestBean testBean = new TestBean();
testBean.setName(env.getProperty("testbean.name"));
return testBean;
}
}

@PropertySource is repeatable

可以在一个 @Configuration 类上添加多个 @PropertySource 注解。

xml 定义中,import 其他bean定义时,可以使用占位符,Spring 会从当前 Environment 中进行解析

1
<import resource="${test}.xml"/>

但是当定义某个 bean 时,必须配置一个 PropertySourcesPlaceholderConfigurer, 才可以使用占位符

1
2
java.beans.PropertyEditor Spring implementation which can convert String paths to Resource objects.
Classloader.getResource()
1
2
3
4
5
6
7
8
9
10
11
12
13
14
15
16
17
18
19
20
21
22
23
24
25
26
27
28
29
30
31
32
33
34
35
36
37
38
39
40
41
42
43
44
45
46
47
48
49
50
51
52
53
54
55
56
57
58
59
60
@Override
public void refresh() throws BeansException, IllegalStateException {
synchronized (this.startupShutdownMonitor) {
// Prepare this context for refreshing.
prepareRefresh();

// Tell the subclass to refresh the internal bean factory.
ConfigurableListableBeanFactory beanFactory = obtainFreshBeanFactory();

// Prepare the bean factory for use in this context.
prepareBeanFactory(beanFactory);

try {
// Allows post-processing of the bean factory in context subclasses.
postProcessBeanFactory(beanFactory);

/*
*
* 在这里处理 PropertySource
*
*/
// Invoke factory processors registered as beans in the context.
invokeBeanFactoryPostProcessors(beanFactory);

// Register bean processors that intercept bean creation.
registerBeanPostProcessors(beanFactory);

// Initialize message source for this context.
initMessageSource();

// Initialize event multicaster for this context.
initApplicationEventMulticaster();

// Initialize other special beans in specific context subclasses.
onRefresh();

// Check for listener beans and register them.
registerListeners();

// Instantiate all remaining (non-lazy-init) singletons.
finishBeanFactoryInitialization(beanFactory);

// Last step: publish corresponding event.
finishRefresh();
}

catch (BeansException ex) {
logger.warn("Exception encountered during context initialization - cancelling refresh attempt", ex);

// Destroy already created singletons to avoid dangling resources.
destroyBeans();

// Reset 'active' flag.
cancelRefresh(ex);

// Propagate exception to caller.
throw ex;
}
}
}

Defining Bean Metadata within Components

在 Component 类中定义 bean 元数据

一般,是在 @Configuration 注解的类中通过 @Bean 方法来定义 bean,同样,Spring 的 @Component 类中也可以用来向容器定义 bean 元数据,使用相同的 @Bean 方法就可以了。

1
2
3
4
5
6
7
8
9
10
11
12
13
14
15
@Component
public class FactoryMethodComponent {

// 定义 bean,其它方法级别的 Spring 注解也可以指定在这里,如 @Lazy,@Scope
@Bean
@Qualifier("public")
public TestBean publicInstance() {
return new TestBean("publicInstance");
}

// 正常的 Spring 组件方法
public void doWork() {
// Component method implementation omitted
}
}

将 InjectionPoint 作为 @Bean 方法的参数

从 Spring 4.3 开始,可以声明一个工厂方法,它的参数类型为 org.springframework.beans.factory.InjectionPoint,用来访问触发当前 bean 创建的请求注入点, 但是这只适用于 bean 实例实际的创建,而不是对已存在实例的注入。所以在原型(prototype)bean 的场景下意义比较大.

如下的例子中,将 userInfo 声明为一个原型 bean,并提供了 InjectionPoint 对象作为 @Bean 方法的参数,在另外两个 bean 的定义中注入 UserInfo 类型的 bean

1
2
3
4
5
6
7
8
9
10
11
12
13
14
15
16
17
18
19
20
21
22
23
24
25
26
27
28
29
30
31
32
33
34
35
36
37
38
39
40
41
42
43
44
45
46
47
48
49
50
51
52
53
54
55
56
57
package com.example.springboot.demo.component;

import com.example.springboot.demo.entity.UserInfo;
import org.springframework.beans.factory.InjectionPoint;
import org.springframework.beans.factory.annotation.Autowired;
import org.springframework.beans.factory.config.PropertiesFactoryBean;
import org.springframework.context.annotation.Bean;
import org.springframework.context.annotation.Scope;
import org.springframework.core.io.ResourceLoader;
import org.springframework.stereotype.Component;

/**
* @author guo
* @date 2021/7/10
*/
@Component
public class FactoryMethodComponent {

/**
* 声明一个 InjectionPoint(或者是子类 DependencyDescriptor)类型的对象作为工厂方法的参数,可以用来访问
* 触发当前 bean 创建的注入点, 但是这只适用于 bean 实例实际的创建,而不是对已存在实例的注入。所以在 prototype bean
* 的场景下意义比较大
*
* @param injectionPoint
* @return
*/
@Bean
@Scope("prototype")
public UserInfo userInfo(InjectionPoint injectionPoint) {
System.out.println("prototype instance for " + injectionPoint.getMember());
return new UserInfo();
}

@Bean
public PropertiesFactoryBean overrideProperties(@Autowired ResourceLoader resourceLoader,
@Autowired UserInfo userInfo) {

System.out.println("inject userInfo from overrideProperties:" + userInfo.hashCode());

PropertiesFactoryBean propertiesFactoryBean = new PropertiesFactoryBean();
propertiesFactoryBean.setLocation(resourceLoader.getResource("classpath:override.properties"));
propertiesFactoryBean.setFileEncoding("UTF-8");
return propertiesFactoryBean;
}

@Bean
public PropertiesFactoryBean applicationProperties(@Autowired ResourceLoader resourceLoader,
@Autowired UserInfo userInfo) {

System.out.println("inject userInfo from applicationProperties:" + userInfo.hashCode());
PropertiesFactoryBean propertiesFactoryBean = new PropertiesFactoryBean();
propertiesFactoryBean.setLocation(resourceLoader.getResource("classpath:application.properties"));
propertiesFactoryBean.setFileEncoding("UTF-8");
return propertiesFactoryBean;
}

}

当容器启动后,可以在控制台中打印进行验证:

1
2
3
4
5
6
7
prototype instance for public org.springframework.beans.factory.config.PropertiesFactoryBean com.example.springboot.demo.component.FactoryMethodComponent.overrideProperties(org.springframework.core.io.ResourceLoader,com.example.springboot.demo.entity.UserInfo)

inject userInfo from overrideProperties:542895457

prototype instance for public org.springframework.beans.factory.config.PropertiesFactoryBean com.example.springboot.demo.component.FactoryMethodComponent.applicationProperties(org.springframework.core.io.ResourceLoader,com.example.springboot.demo.entity.UserInfo)

inject userInfo from applicationProperties:2049646260

Component 类和 Configuration 类中声明 bean 定义的区别

@Component 类中的 @Bean 方法的处理与 @Configuration 中的处理不同, 区别在于对于 @Component 类, CGLIB 并不会拦截对方法和字段的调用,而在 @Configuration 类中,CGLIB 的代理是通过对 @Bean 方法中的方法和字段调用来创建对协作对象(依赖)的 bean 元数据引用(bean metadata references), 这样的方法并不是通过一般的 Java 语义 进行调用的,而是通过容器来提供声明周期管理和 Spring beans 的代理, 即使是通过程序式的调用某个 @bean 方法来引用该 bean.

1
2
3
4
5
6
7
8
9
10
11
12
13
@Configuration
public class AppConfig {

@Bean
public BeanOne beanOne() {
return new BeanOne(beanTwo());
}

@Bean
public BeanTwo beanTwo() {
return new BeanTwo();
}
}

Component 类中的某个 @Bean 方法中,调用其它方法或字段,只是标准的 Java 方法调用语义,并没有特殊的 CGLIB 的处理和约束.

静态 @bean 方法

@Bean 方法也可以声明为静态的,这样就不需在创建所在 Configuration 或 Component 实例后,才能调用。当定义后置处理器 bean 时非常有意义,如 BeanFactoryPostProcessor 或者是 BeanPostProcessor, 这是因为这些 bean 需要在容器生命周期的早期就进行初始化,并且要避免对配置类的其它部分进行初始化。

如,Spring Boot 中的的自动配置类 PropertySourcesPlaceholderConfigurer (PropertySource/bean property externalized BeanFactoryPostProcessor )

1
2
3
4
5
6
7
8
9
10
11
12
13
14
15
16
17
18
19
/**
* {@link EnableAutoConfiguration Auto-configuration} for
* {@link PropertySourcesPlaceholderConfigurer}.
*
* @author Phillip Webb
* @author Dave Syer
* @since 1.5.0
*/
@Configuration(proxyBeanMethods = false)
@AutoConfigureOrder(Ordered.HIGHEST_PRECEDENCE)
public class PropertyPlaceholderAutoConfiguration {

@Bean
@ConditionalOnMissingBean(search = SearchStrategy.CURRENT)
public static PropertySourcesPlaceholderConfigurer propertySourcesPlaceholderConfigurer() {
return new PropertySourcesPlaceholderConfigurer();
}

}

对静态 @Bean 方法的调用,并不会被容器拦截,即使是定义在 @Configuration 类中,这是由于技术的限制:CGLIB 子类只能覆盖非静态方法,所以在某个 @Bean 方法中,对这些静态 @Bean 方法的调用遵循标准的 Java 语义,返回一个新的实例对象.

@Bean 方法的可见性

@Bean 方法的 Java 语言可见性不会对 Spring 容器中生成的 bean 定义产生直接影响。在非 @Configurtation 类中, 可以自由定义方法的可见性 (无论是静态的还是非静态的), 但是在 @Configuration 类中, 一般的 @Bean 方法式需要是可覆盖的 (代理子类), 所以不能被声明为 privatefinal.

@Bean 方法可以被声明在给定的 component 或者 configuration 类的基类中, 或者是这些类所实现的接口的默认方法上 (Java 8 default method). 这样在组合复杂的配置时, 可以具有更多的灵活性.

参考阅读

Core Technologies (spring.io) - Defining Bean Metadata within Components

并行流 MapCollect 模型

并行流 MapCollect 模型

Java 8 中引入了流 Stream,并通过流极大的简化了集合以及I/O ( 见 Files 类) 的操作,和 Spark 中对 RDD 的各种操作是类似的。并且通过 ForkJoin 框架实现了并行流 (基于分治的思想),如果和 Spark RDD 相比,都给开发者提供了将任务并行化的便利,RDD 中的每个 Partition 对应一个 Task,由 Spark 中的执行器分别执行,Java 中的并行流拆分后的每一个 Spliterator (可拆分迭代器)也是一个任务,由 ForkJoin 公用池中的工作线程执行,而且 Stream 与 RDD 都有类似的中间操作和终端操作,异曲同工啊。并且都为开发者提供了易于使用的接口或者说数据结构。

MapCollect 模型 (见 《精通 Java 并发编程》)也就是使用流来收集数据,将最终的结果收集在一个容器中,而不是约简为(reduce)为一个值,对应 java.util.stream.Stream#collect(java.util.stream.Collector<? super T,A,R>) 方法, 需要提供一个收集器 Collector 对象。

JDK 中 Collector 接口中有这样一段话:

For concurrent collectors, an implementation is free to (but not required to) implement reduction concurrently. A concurrent reduction is one where the accumulator function is called concurrently from multiple threads, using the same concurrently-modifiable result container, rather than keeping the result isolated during accumulation. A concurrent reduction should only be applied if the collector has the Collector.Characteristics.UNORDERED characteristics or if the originating data is unordered.

对于并发收集器 concurrent collectors 的实现, 可以自由实现并发规约. 并发规约 concurrent reduction 指的是的 accumulator 函数可以被多个线程并发调用, 且使用同一个支持并发修改的结果容器 (支持并发修改, 普通的 ArrayList 显然不支持并发修改), 而不是在累加函数执行过程中保持独立的结果容器 (即每个拆分后的任务拥有一个结果容器). 并发规约只有该收集器指定 UNORDERED 特征 (即不关心元素被处理的顺序),或者背后的数据源本身是无序的才可以应用该优化 (当然,也要指定 CONCURRENT 特征).

收集器的 UNORDERED 特征与无序的 Stream 指的同一件事情,即不要求按照流中的元素的顺序来依次处理,这在并行流的某些终端操作下,无疑可以提升性能。

流的串行执行过程

首先是串行实现过程, 对一个数字流进行转换并收集到一个 List 中:

1
2
3
4
5
6
7
8
9
10
11
12
13
14
15
16
17
List<String> collectResult = IntStream.rangeClosed(1, 20)
.mapToObj(String::valueOf)
.collect(
// 这里可以替换为 Collectors.toList(), 这里是为了打印每个函数执行线程的上下文
Collector.of(
() -> {
List<String> strings = new ArrayList<>();
System.out.println(Thread.currentThread() + " create supplier ");
return strings;
}, (l, e) -> {
System.out.println(Thread.currentThread() + " accumulate " + e);
l.add(e);
}, (left, right) -> {
System.out.println(Thread.currentThread() + " combine");
left.addAll(right);
return left;
}, Collector.Characteristics.IDENTITY_FINISH));

控制台打印的结果:

1
2
3
4
5
6
7
8
9
10
11
12
13
14
15
16
17
18
19
20
21
Thread[main,5,main] create supplier 
Thread[main,5,main] accumulate 1
Thread[main,5,main] accumulate 2
Thread[main,5,main] accumulate 3
Thread[main,5,main] accumulate 4
Thread[main,5,main] accumulate 5
Thread[main,5,main] accumulate 6
Thread[main,5,main] accumulate 7
Thread[main,5,main] accumulate 8
Thread[main,5,main] accumulate 9
Thread[main,5,main] accumulate 10
Thread[main,5,main] accumulate 11
Thread[main,5,main] accumulate 12
Thread[main,5,main] accumulate 13
Thread[main,5,main] accumulate 14
Thread[main,5,main] accumulate 15
Thread[main,5,main] accumulate 16
Thread[main,5,main] accumulate 17
Thread[main,5,main] accumulate 18
Thread[main,5,main] accumulate 19
Thread[main,5,main] accumulate 20

串行只有一个线程 (主线程) 来执行规约过程, 调用 supplier 函数创建结果容器(累加器), 执行 accumulate 累加过程 (将流中的元素添加到结果容器中), 并且由于中间结果容器就是最终想要的结果, 而且是串行的, 不需要执行 combine 和 finish 函数

流的并行执行过程

通过 parallel 方法将流转换为并行流, 其它不变

1
2
3
4
5
6
7
8
9
10
11
12
13
14
15
16
17
List<String> collectResult = IntStream.rangeClosed(1, 20)
.mapToObj(String::valueOf)
.parallel()
.collect(
Collector.of(
() -> {
ArrayList<String> strings = new ArrayList<>();
System.out.println(Thread.currentThread() + " create supplier ");
return strings;
}, (l, e) -> {
System.out.println(Thread.currentThread() + " accumulate " + e);
l.add(e);
}, (left, right) -> {
System.out.println(Thread.currentThread() + " combine");
left.addAll(right);
return left;
}, Collector.Characteristics.IDENTITY_FINISH));

控制台打印的结果:

1
2
3
4
5
6
7
8
9
10
11
12
13
14
15
16
17
18
19
20
21
22
23
24
25
26
27
28
29
30
31
32
33
34
35
36
37
38
39
40
41
42
43
44
45
46
47
48
49
50
51
52
53
54
55
56
57
58
59
Thread[main,5,main] create supplier 
Thread[ForkJoinPool.commonPool-worker-6,5,main] create supplier
Thread[ForkJoinPool.commonPool-worker-3,5,main] create supplier
Thread[ForkJoinPool.commonPool-worker-3,5,main] accumulate 18
Thread[ForkJoinPool.commonPool-worker-4,5,main] create supplier
Thread[ForkJoinPool.commonPool-worker-1,5,main] create supplier
Thread[ForkJoinPool.commonPool-worker-1,5,main] accumulate 15
Thread[ForkJoinPool.commonPool-worker-7,5,main] create supplier
Thread[ForkJoinPool.commonPool-worker-2,5,main] create supplier
Thread[ForkJoinPool.commonPool-worker-5,5,main] create supplier
Thread[ForkJoinPool.commonPool-worker-5,5,main] accumulate 11
Thread[ForkJoinPool.commonPool-worker-5,5,main] create supplier
Thread[ForkJoinPool.commonPool-worker-5,5,main] accumulate 2
Thread[ForkJoinPool.commonPool-worker-2,5,main] accumulate 12
Thread[ForkJoinPool.commonPool-worker-1,5,main] create supplier
Thread[ForkJoinPool.commonPool-worker-7,5,main] accumulate 7
Thread[ForkJoinPool.commonPool-worker-4,5,main] accumulate 14
Thread[ForkJoinPool.commonPool-worker-3,5,main] create supplier
Thread[ForkJoinPool.commonPool-worker-6,5,main] accumulate 3
Thread[ForkJoinPool.commonPool-worker-6,5,main] create supplier
Thread[main,5,main] accumulate 13
Thread[ForkJoinPool.commonPool-worker-6,5,main] accumulate 5
Thread[ForkJoinPool.commonPool-worker-3,5,main] accumulate 20
Thread[ForkJoinPool.commonPool-worker-4,5,main] combine
Thread[ForkJoinPool.commonPool-worker-7,5,main] create supplier
Thread[ForkJoinPool.commonPool-worker-1,5,main] accumulate 9
Thread[ForkJoinPool.commonPool-worker-2,5,main] combine
Thread[ForkJoinPool.commonPool-worker-5,5,main] create supplier
Thread[ForkJoinPool.commonPool-worker-2,5,main] create supplier
Thread[ForkJoinPool.commonPool-worker-1,5,main] create supplier
Thread[ForkJoinPool.commonPool-worker-7,5,main] accumulate 6
Thread[ForkJoinPool.commonPool-worker-4,5,main] combine
Thread[ForkJoinPool.commonPool-worker-3,5,main] create supplier
Thread[ForkJoinPool.commonPool-worker-6,5,main] create supplier
Thread[ForkJoinPool.commonPool-worker-6,5,main] accumulate 4
Thread[ForkJoinPool.commonPool-worker-6,5,main] combine
Thread[main,5,main] create supplier
Thread[ForkJoinPool.commonPool-worker-6,5,main] combine
Thread[ForkJoinPool.commonPool-worker-3,5,main] accumulate 19
Thread[ForkJoinPool.commonPool-worker-4,5,main] combine
Thread[ForkJoinPool.commonPool-worker-7,5,main] combine
Thread[ForkJoinPool.commonPool-worker-1,5,main] accumulate 10
Thread[ForkJoinPool.commonPool-worker-2,5,main] accumulate 17
Thread[ForkJoinPool.commonPool-worker-5,5,main] accumulate 1
Thread[ForkJoinPool.commonPool-worker-1,5,main] combine
Thread[ForkJoinPool.commonPool-worker-3,5,main] combine
Thread[ForkJoinPool.commonPool-worker-6,5,main] create supplier
Thread[main,5,main] accumulate 8
Thread[ForkJoinPool.commonPool-worker-6,5,main] accumulate 16
Thread[ForkJoinPool.commonPool-worker-3,5,main] combine
Thread[ForkJoinPool.commonPool-worker-5,5,main] combine
Thread[ForkJoinPool.commonPool-worker-6,5,main] combine
Thread[main,5,main] combine
Thread[ForkJoinPool.commonPool-worker-6,5,main] combine
Thread[ForkJoinPool.commonPool-worker-5,5,main] combine
Thread[main,5,main] combine

可见中间穿插着多次创建中间结果容器 (打印 create supplier), 也多次调用了 combine 函数对中间容器的结果进行合并, 复合预期, 也就是通过 ForkJoin 框架对数据进行递归划分, 每个划分创建自己的结果容器, 针对该划分内的元素进行累加过程, 最终将所有划分的结果进行合并得到最终的结果.

并发规约

接下来, 指定收集器的特征为 Collector.Characteristics.CONCURRENT, Collector.Characteristics.UNORDERED 以实现并发规约过程, 并且使用了线程安全的 CopyOnWriteArrayList 作为结果容器, 支持并发修改

1
2
3
4
5
6
7
8
9
10
11
12
13
14
15
16
17
18
19
List<String> collectResult = IntStream.rangeClosed(1, 20)
.parallel()
.mapToObj(String::valueOf)
.collect(
Collector.of(
() -> {
CopyOnWriteArrayList<String> strings = new CopyOnWriteArrayList<>();
System.out.println(Thread.currentThread() + " create supplier ");
return strings;
}, (l, e) -> {
System.out.println(Thread.currentThread() + " accumulate " + e);
l.add(e);
}, (left, right) -> {
System.out.println(Thread.currentThread() + " combine");
left.addAll(right);
return left;
}, Collector.Characteristics.IDENTITY_FINISH,
Collector.Characteristics.CONCURRENT,
Collector.Characteristics.UNORDERED));

控制台打印结果:

1
2
3
4
5
6
7
8
9
10
11
12
13
14
15
16
17
18
19
20
21
Thread[main,5,main] create supplier 
Thread[ForkJoinPool.commonPool-worker-3,5,main] accumulate 2
Thread[ForkJoinPool.commonPool-worker-6,5,main] accumulate 7
Thread[ForkJoinPool.commonPool-worker-7,5,main] accumulate 18
Thread[ForkJoinPool.commonPool-worker-1,5,main] accumulate 3
Thread[ForkJoinPool.commonPool-worker-7,5,main] accumulate 20
Thread[ForkJoinPool.commonPool-worker-3,5,main] accumulate 12
Thread[ForkJoinPool.commonPool-worker-6,5,main] accumulate 6
Thread[main,5,main] accumulate 13
Thread[ForkJoinPool.commonPool-worker-4,5,main] accumulate 4
Thread[ForkJoinPool.commonPool-worker-2,5,main] accumulate 5
Thread[ForkJoinPool.commonPool-worker-5,5,main] accumulate 1
Thread[ForkJoinPool.commonPool-worker-2,5,main] accumulate 8
Thread[ForkJoinPool.commonPool-worker-4,5,main] accumulate 14
Thread[main,5,main] accumulate 15
Thread[ForkJoinPool.commonPool-worker-6,5,main] accumulate 9
Thread[ForkJoinPool.commonPool-worker-3,5,main] accumulate 11
Thread[ForkJoinPool.commonPool-worker-7,5,main] accumulate 19
Thread[ForkJoinPool.commonPool-worker-1,5,main] accumulate 17
Thread[ForkJoinPool.commonPool-worker-2,5,main] accumulate 16
Thread[ForkJoinPool.commonPool-worker-5,5,main] accumulate 10

可以看出, 只创建了一个中间结果容器对象, 所有的线程调用累加函数的时候, 都使用该容器. 并将最终的结果返回.

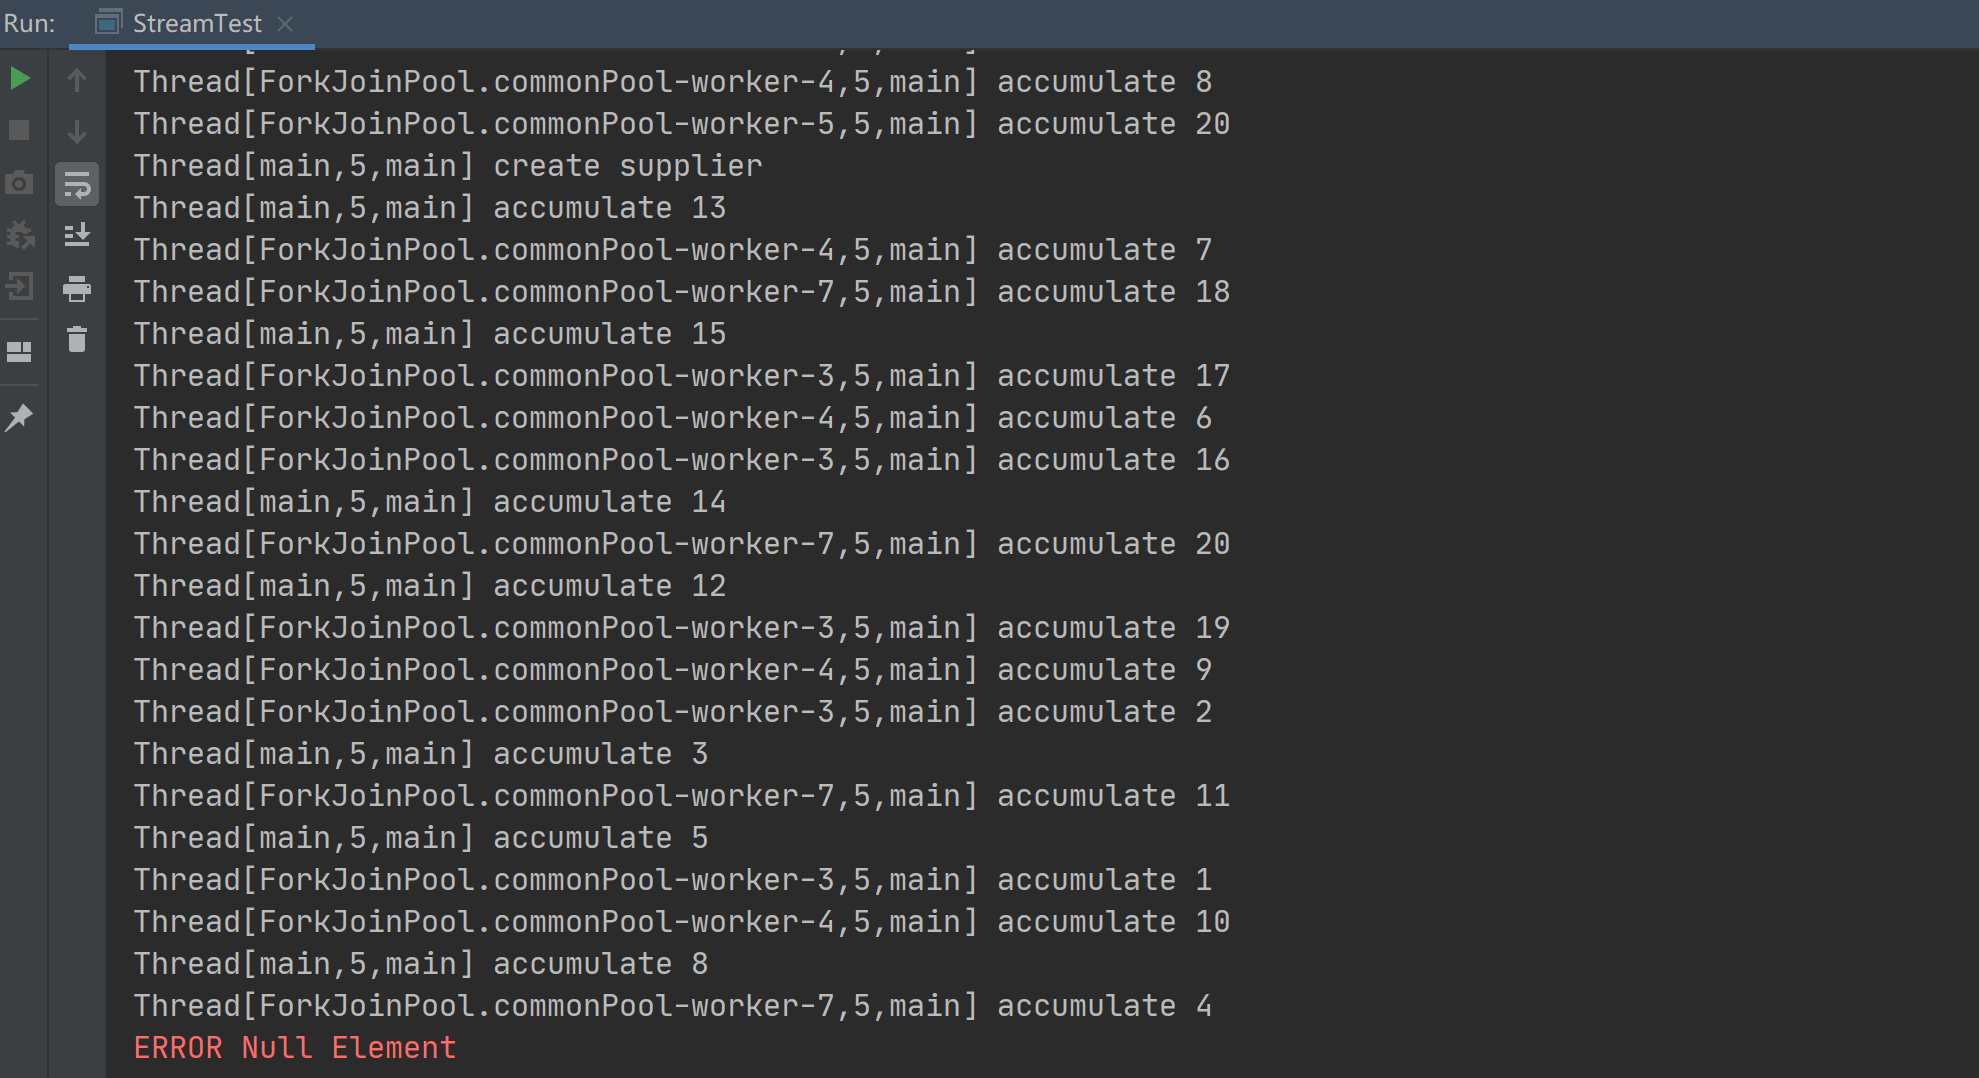
如果使用线程不安全的 ArrayList, 如下所示, 为了验证最终结果的错误, 循环执行, 直到某次执行因为并发修改引起异常或结果中出现 Null 元素终止:

1
2
3
4
5
6
7
8
9
10
11
12
13
14
15
16
17
18
19
20
21
22
23
24
25
26
27
28
while (true) {
List<String> collectResult = IntStream.rangeClosed(1, 20)
.parallel()
.mapToObj(String::valueOf)
.collect(
Collector.of(
() -> {
// 使用 ArrayList 作为中间结果容器
List<String> strings = new ArrayList<>();
System.out.println(Thread.currentThread() + " create supplier ");
return strings;
}, (l, e) -> {
System.out.println(Thread.currentThread() + " accumulate " + e);
l.add(e);
}, (left, right) -> {
System.out.println(Thread.currentThread() + " combine");
left.addAll(right);
return left;
}, Collector.Characteristics.IDENTITY_FINISH,
Collector.Characteristics.CONCURRENT,
Collector.Characteristics.UNORDERED));

// ArrayList 并发修改,可能会引起某个元素为 Null
if (collectResult.stream().anyMatch(Objects::isNull)) {
System.err.println("ERROR Null Element");
break;
}
}

执行结果:

由于并行规约会创建一个中间结果容器, 并在多个线程的累加函数中使用, 此处使用的是非线程安全的 ArrayList, 因此在执行过程中会出现异常或 Null 元素而退出

image-20210605211443693

是否要使用并行化流

并行流是否能提升性能, 需要综合考虑, 不一定就比串行流的执行效率高, 比如数据量较小, ForkJoin 的递归划分和合并总归是有性能消耗的. 这其实和是否要对某个任务进行并行化, 怎样进行并行化要做的考虑是类似的. 见 《Java 实战 (第2版)》第 7 章 的 正确使用并行流高效使用并行流

参考阅读

[1] 精通 Java 并发编程

[2] Java 实战

[3] Collector (Java Platform SE 8 ) (oracle.com)

Stream

Java 8 中引入了 Stream 流,上手使用流对开发人员来说都很简单(大多数场景下,只需要调用 java.util.Collection#stream 方法就可以创建一个流),这是因为流就是一个 DSL (Domain Specific Language,领域特定语言),抛开 Java 的上下文,使用流完成集合的操作,就像编写 SQL 语句一样流畅(fluent),简洁。

JDK 8 中关于 java.util.stream 包的介绍,即关于引入流的一些介绍,包括了对流的认识与使用的注意事项。

流与集合的区别

  1. 流不是一个存储数据的数据结构,流的数据来自于背后绑定的数据源 (data source),可以是一个集合,一个数组,I/O 信道 (I/O Channel), 一个数据生成函数(可以生成一个无限流,Lazy 模式,需要时生成数据),流通过一个计算操作管道 (pipeline of computational operations) 传输数据源中的数据。
  1. 天生的函数式特质,流上的操作生成一个结果,并不修改它背后的数据源. 这句话的意思其实就是因为流不改变作为创建它本身的数据源,无副作用(side affect),符合函数式编程。例如对一个流应用 filter 操作,会生成一个只包含满足指定条件元素的流,并不会删除数据源中的元素。
  1. 懒加载 (Laziness-seeking),许多流操作,如 filtermapdistinct 操作都可以懒惰地实现 (implemented lazily), 给了对这些操作进行优化的机会, 例如流的截断操作 (limit) 和短路操作 (如 findFirst), 使得并不需要遍历流中的所有元素就可以返回结果(流的中间操作 (intermediate) 都是 lazy 的);还有组成流管道的众多操作,可以被作为一个整体,对流中的元素仅应用一次,减少中间状态的使用。
  1. 可能是无界的,Java 中肯定无法包含一个的无限元素的 ArrayList,或者在特定大小的内存下,比如一个所有偶数的列表,但是流可以做到,其实就是因为流是懒加载的,通过生成器函数,在需要时才生成下一个遍历的元素,流的 limitfindFirst 操作可以在一个无限流上进行截断操作有限的数据。
  1. 可消费的 (Consumable). 流中的元素只在流的生命周期中可以访问,和 Iterator 一样,如果需要重新遍历数据源中的元素,需要生成一个新的流。

状态

中间操作可以被进一步分为无状态 (stateless) 和有状态 (stateful) 的操作。无状态的操作,如 filtermap ,处理新元素时不需要保留之前已经处理过元素的任何状态,每一个元素的处理都是独立的。有状态的操作,例如 distinct, sorted, 就需要保留之前已经处理过元素的一些状态。

有状态的操作可能要遍历整个流才能生成一个结果,例如,只有遍历完流的所有元素,才能完成对流的排序操作。在并行计算下,一些包含保留状态的中间操作的流管道可能需要多次处理数据或者需要缓存大量的数据。而仅包含无状态的流管道,可以一次性处理,无论是在串行还是并行情况下,都需要进行很少的数据缓存。

短路操作

一些操作也可以被看作短路操作 short-circuiting,对于中间操作,短路操作意味着可以将一个无限流转换为一个有限流;对于终端操作,短路操作意味着对于一个无限流,可以在有限的时间内结束对流的处理。

并行流

所有的流可以以串行或者并行的方式执行,串行的流就是将显示的外部迭代变为内部迭代,流的并行也就是对数据进行递归划分,使用 ForkJoin 公用池的工作线程来执行。默认创建的流都是串行流,对于集合类,可以使用 Collection.parallelStream() 创建并行流,对于其它流,可以使用 BaseStream.parallel 方法指定该流为并行流,BaseStream.sequential 方法指定为串行流。

除了一些显示标识为结果不确定的一些操作(例如 findAny),流的串行执行和并行执行结果应该保持一致。

大多数流操作都接受描述用户指定行为的参数,通常是 lambda 表达式。为了使得最终的结果正确,这些行为参数应该是无干扰(non-interfering)的,大多数场景下应该是无状态的(stateless)。

Non-interference

流可以让我么你在不同的数据源上可能并行的执行一些聚合操作,甚至包括非线程安全的集合,如 ArrayList。但是只有在六管道执行的时候哦,阻止对数据源的干扰才能做到。流的执行,基本都是通过调用终端操作触发,当终端操作结束后,流的执行也就结束了。对于大多数数据源,保持非干扰性,意味着确保流管道在执行的过程中完全保持不对数据源进行修改。例外就是数据源本身是一个并发集合,本身就被设计为使用在并发场景下。并发的流数据源,它们的 Spliterator 应该具有 CONCURRENT 的特征。

因此,如果流的数据源是不支持并发的, 应用于流管道的行为参数就不应该修改流的数据源。如果行为参数本身或者间接导致了流数据源的修改,则称该行为会干扰非并发数据源的流。这种约束适用于所有的流. 对于行为良好的流的数据源,可以在终端操作开始之前修改数据源,这些修改将反映在涵盖的元素中。

1
2
3
4
List<String> l = new ArrayList(Arrays.asList("one", "two"));
Stream<String> sl = l.stream();
l.add("three");
String s = sl.collect(joining(" ")); // 最终 s 的结果为 'one two three'

JDK 集合类返回的流和 JDK 中包含的大多数类返回的流都是 well-behave.

Stateless behaviors

如果行为参数是有状态的, 那么流的计算结果可能是不确定的或者不正确的. 一个有状态的行为指的是它的结果取决于任何在流的执行期间有可能改变的任何状态.

1
2
3
4

Set<Integer> seen = Collections.synchronizedSet(new HashSet<>());

stream.parallel().map(e -> { if (seen.add(e)) return 0; else return e; })...

这个例子中的流是一个并行流, 针对一个相同的元素, 每次调用 map 返回的结果可能是不同的, 这是因为线程的调度是不确定的, 而无状态的行为就会保证行为的结果总是一样的.

同样,应该注意的是, 在行为参数中方位可变的状态,会造成安全和性能方面的问题,如果你尝试使用同步机制来进行访问,那意味着要在数据竞争的情况下损失一定的性能。所以最好的办好就是使用无状态的行为参数。

Side-effects

不鼓励在流的计算中使用具有副作用的行为参数,因为它们通常会导致在不知情的情况下违反无状态要求,并危害线程安全。

如果行为参数具有副作用,除非显示声明,不能保证这些副作用对其它线程的可见性,也不能保证同一个流的同一个元素的不同的操作的执行是在同一个线程中. 这些副作用的影响顺序也可能令人意外.

即使一个流被限制为它的计算结果于流绑定的数据源元素的顺序一致, (如 IntStream.range(0,5).parallel().map(x -> x*2).toArray() 的结果必须是 [0, 2, 4, 6, 8]), 也不保证映射器函数应用于单个元素的顺序,或者对于给定元素在哪个线程中执行任何行为参数。

使用流提供的 reduce 操作, 可以让一些倾向于使用副作用的计算可以更安全、更有效. 当然, forEach, peek 这样的操作必定是副作用的, 使用时需要注意. 一些具有副作用的语句, 如处于 debug 使用 println , 通常没有什么危害性.

将具有副作用的操作转换为无副作用

before

1
2
3
4
5
ArrayList<String> results = new ArrayList<>();
stream.filter(s -> pattern.matcher(s).matches())
.forEach(s -> results.add(s)); // Unnecessary use of side-effects!

// 运行在并行流的情况下, ArrayList 不是线程安全的, 会导致不正确的结果或者抛出异常, 添加同步机制,会导致数据竞争

after

1
2
3
4
     List<String>results =
stream.filter(s -> pattern.matcher(s).matches())
.collect(Collectors.toList()); // No side-effects!
// 使用无副作用的 toList 收集器, 更安全

Ordering

流是否有序 (encounter order, 遇到每个元素的顺序), 取决于绑定的数据源以及中间操作, 特定的流数据源 (例如 List 或者数组) 本来就是有序的, 而其它的 (如 HashSet) 是无序的. 一些中间操作, 如 sorted, 会将一个无序的流变为有序的, 其它的操作可能与之相反, 将一个有序流变为无需流, 如 BaseStream.unordered. 此外, 一些终端操作可能忽略有序性, 如 forEach 操作.

如果流是有序的,则大多数操作都被限制为按元素遇到的顺序对元素进行操作, 如果流的源是一个包含 [1, 2, 3] 的 List,那么执行 map(x -> x*2) 的结果一定是 [2, 4, 6]. 但是,如果源没有定义的相遇顺序,则值 [2, 4, 6] 的任何排列都将是有效结果。

对串行流, 一个流是否有序, 并不会影响性能, 影响的是确定性. 如果一个流是有序的, 相同数据源的生成流的重复执行会生成一致的结果, 如果是无序的, 则可能会生成不一致的结果.

对于并行流, 如果流是无序的, 可以更高效地执行. 一些特定的聚合操作, 如 distinct, Collectors.groupingBy, 如果流是无序的, 可以被更高效的实现. 类似地, 与遇到顺序相关的操作,例如 limit,可能需要缓存以确保正确排序,从而破坏了并行性的好处。

如果某个流是有序的, 但是用户并不关心流中元素被处理地顺序, 使用 unordered() 显式将流变为无序, 可能会提高某些有状态或终端操作的并行性能. 然而,大多数流管道,例如计算一个整数流的总和,即使流是有序的, 仍然可以有效地并行化。

这里的有序和无序指的是流中的元素的顺序是确定的还是不确定的.